Playbooks
How to Use the Consensus Stage for Improved QA in V7
9 min read
—
Mar 26, 2023
This stage helps users ensure accuracy, consistency, and quality of annotated datasets while minimizing manual review time. It also allows for comparison of model and human performance.

Content Creator
Intro
Labeling edge cases for machine learning can be challenging - and even experts may disagree, resulting in inaccuracies in annotations that negatively affect your model’s performance.
To help our users create error-free training data more efficiently, we are thrilled to announce the introduction of the Consensus Stage. This new feature:
Allows multiple users or models to label the same task in a blind test
Calculates any differences in the applied labels between the users or models once the task is complete
Surfaces any disagreements and allows them to be reviewed and resolved
What is a Consensus stage?
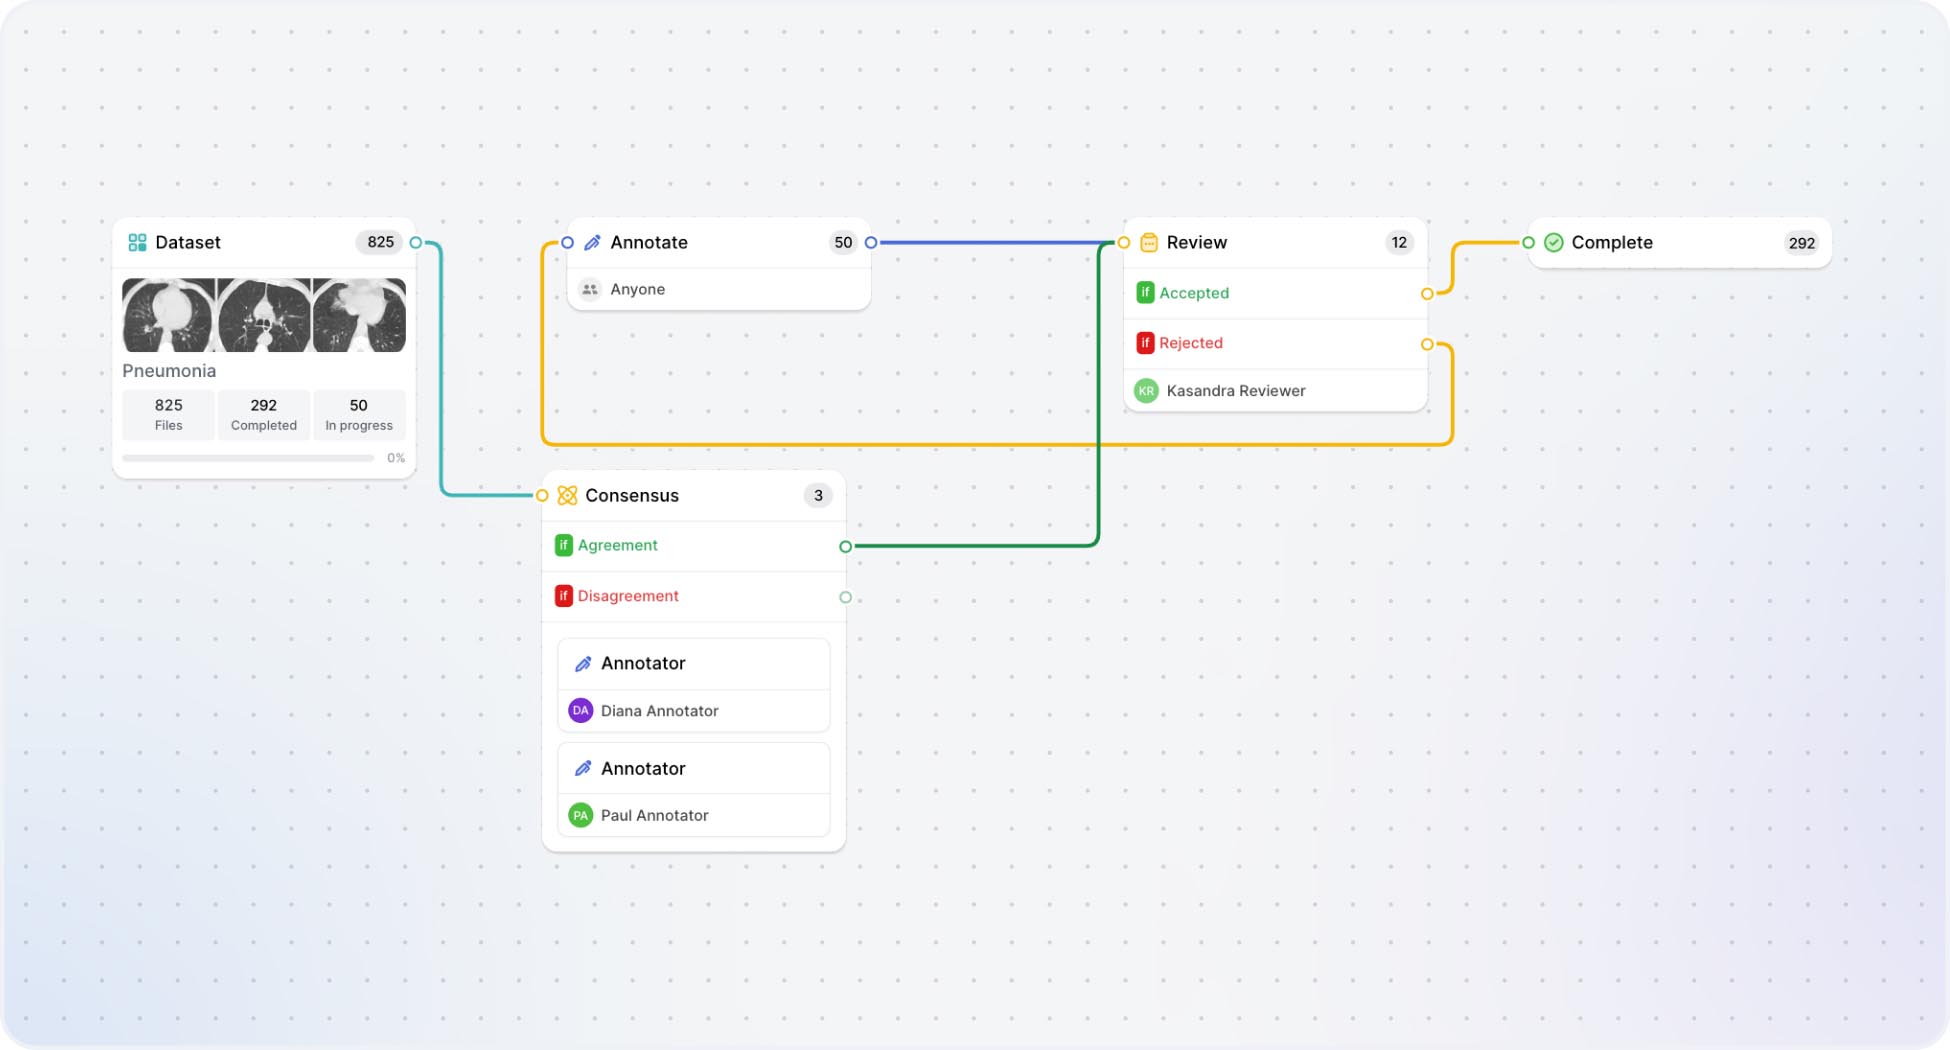
The Consensus Stage measures the degree of agreement (overlap of the annotation area) among multiple annotators and/or models and highlights any areas of disagreement. This enables the selection of the best possible annotation and reduces the amount of time required for manual review.
Learn more about building custom workflows on V7.
Benefits of the Consensus stage
The Consensus Stage is a crucial part of the ML data annotation workflow that helps ensure the accuracy, consistency, and quality of the annotated dataset. The benefits of implementing a Consensus Stage include:
Reduced bias & improved data quality
Consensus helps to reduce bias in the annotation process, as it provides an opportunity to identify and correct any inconsistencies introduced by individual annotators. This ensures that the final annotations are accurate across all data instances. You can compare the annotator-to- annotator, model-to-model, and annotator-to-model performance.
Faster annotation time
While consensus can add an extra step to the annotation process, it can actually help to speed up the overall process by reducing the number of individual annotations that need to be reviewed. You can take advantage of the model vs annotator setup to reduce the annotation time and cost (using a model instead of having two human annotators labeling data in parallel) and getting to agreement faster with fewer items going through the review stage.
Better model performance
Consensus can improve model performance by providing a more reliable and accurate training dataset, which can lead to better predictions and results. As V7 is FDA and HIPAA compliant, this will allow V7 users to create FDA-approved models faster and with more confidence.
Improve your team’s understanding of classes
The Consensus stage offers a comprehensive data overview. You can compare annotator performance and spot inconsistencies, add comments, and resolve disagreements. This process helps identify areas that require further training or guidance.
Higher degree of workflow customization
By incorporating a Consensus stage into the workflow, V7 allows for custom rules to be created to handle conflicting annotations, such as requiring a minimum number of annotators to agree on an annotation, or assigning more weight to certain annotators based on their expertise or performance. This level of customization can help to tailor the workflow to the specific needs and requirements of a particular project or dataset.
How to set up the Consensus stage on V7 - Tutorial
Setting up a Consensus stage on V7 is easy and extremely intuitive. Here’s a step-by-step tutorial to help you navigate this process seamlessly.
1. Add and connect a Consensus Stage to your workflow in the workflows view.
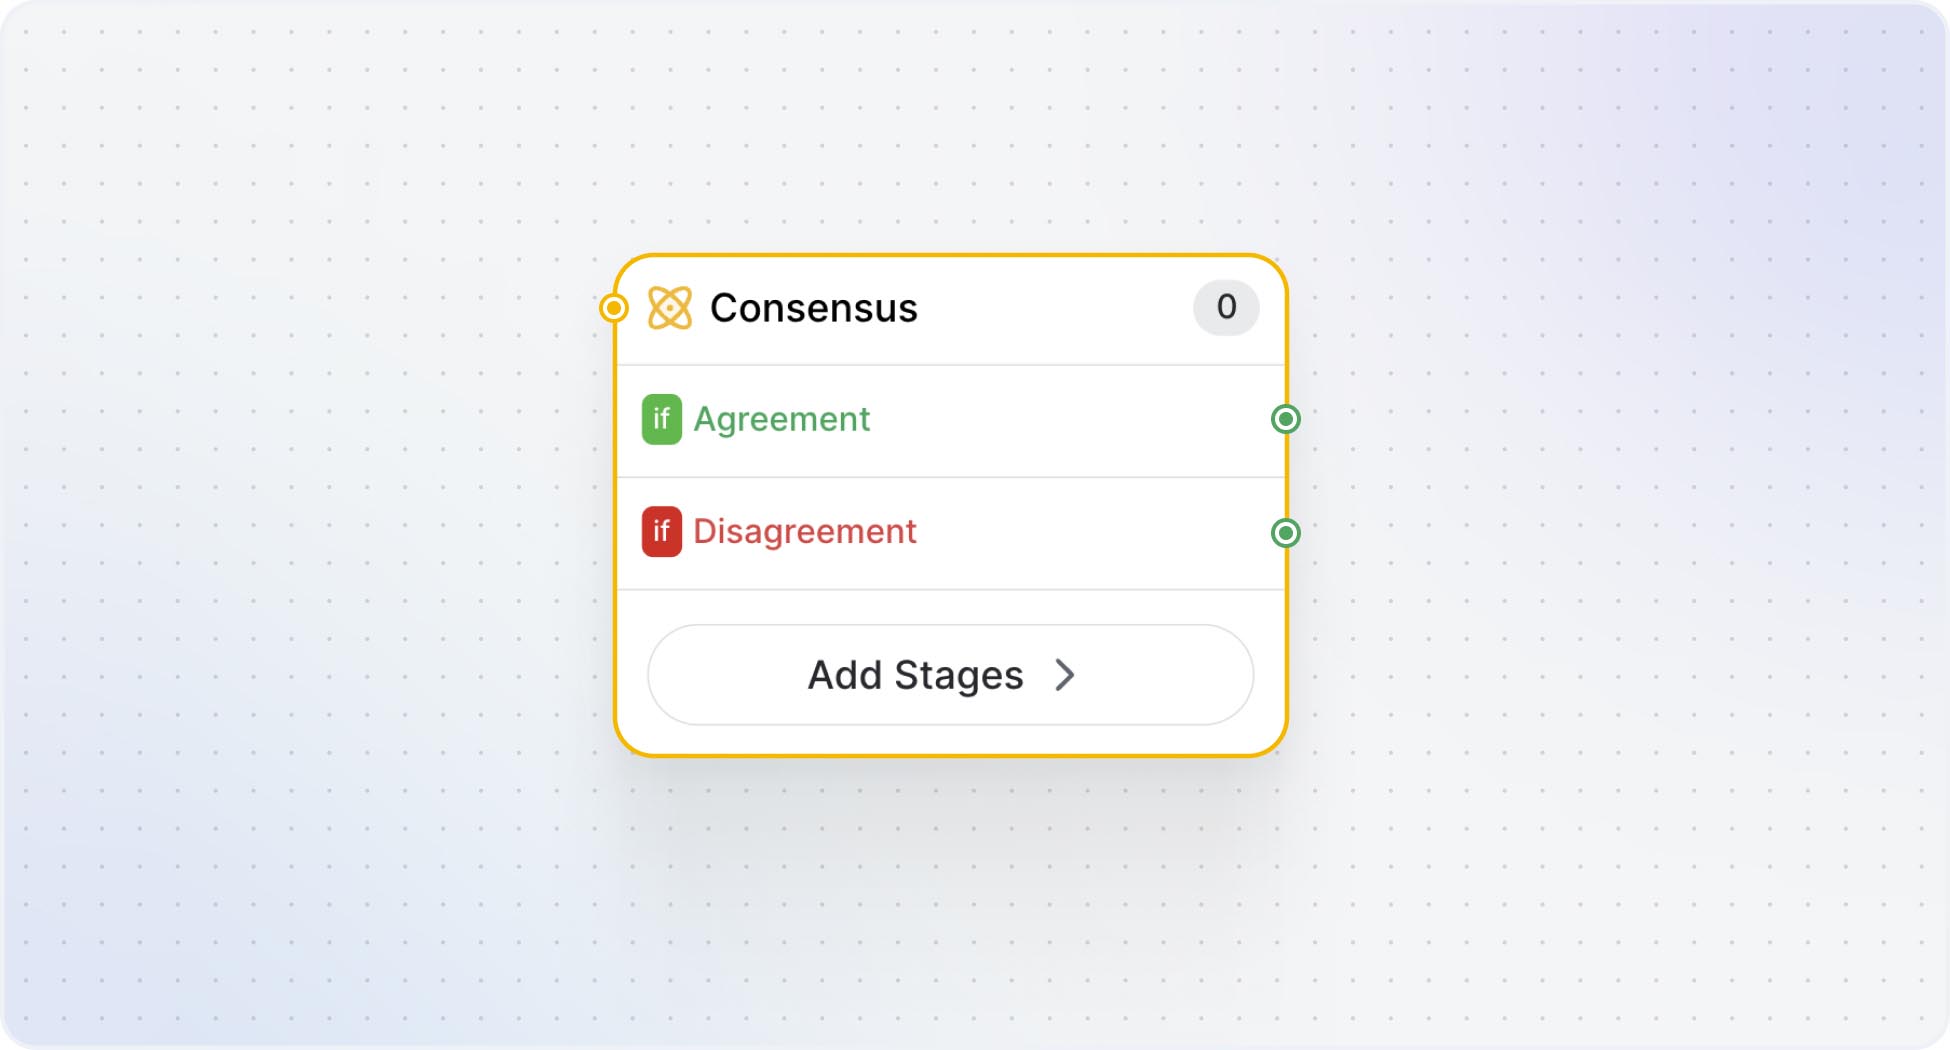
2. Specify which annotators and/or models will participate in the Consensus stage. You can add multiple parallel stages and annotators per parallel stage - comparing the performance between individual annotators, models, and annotators against models.
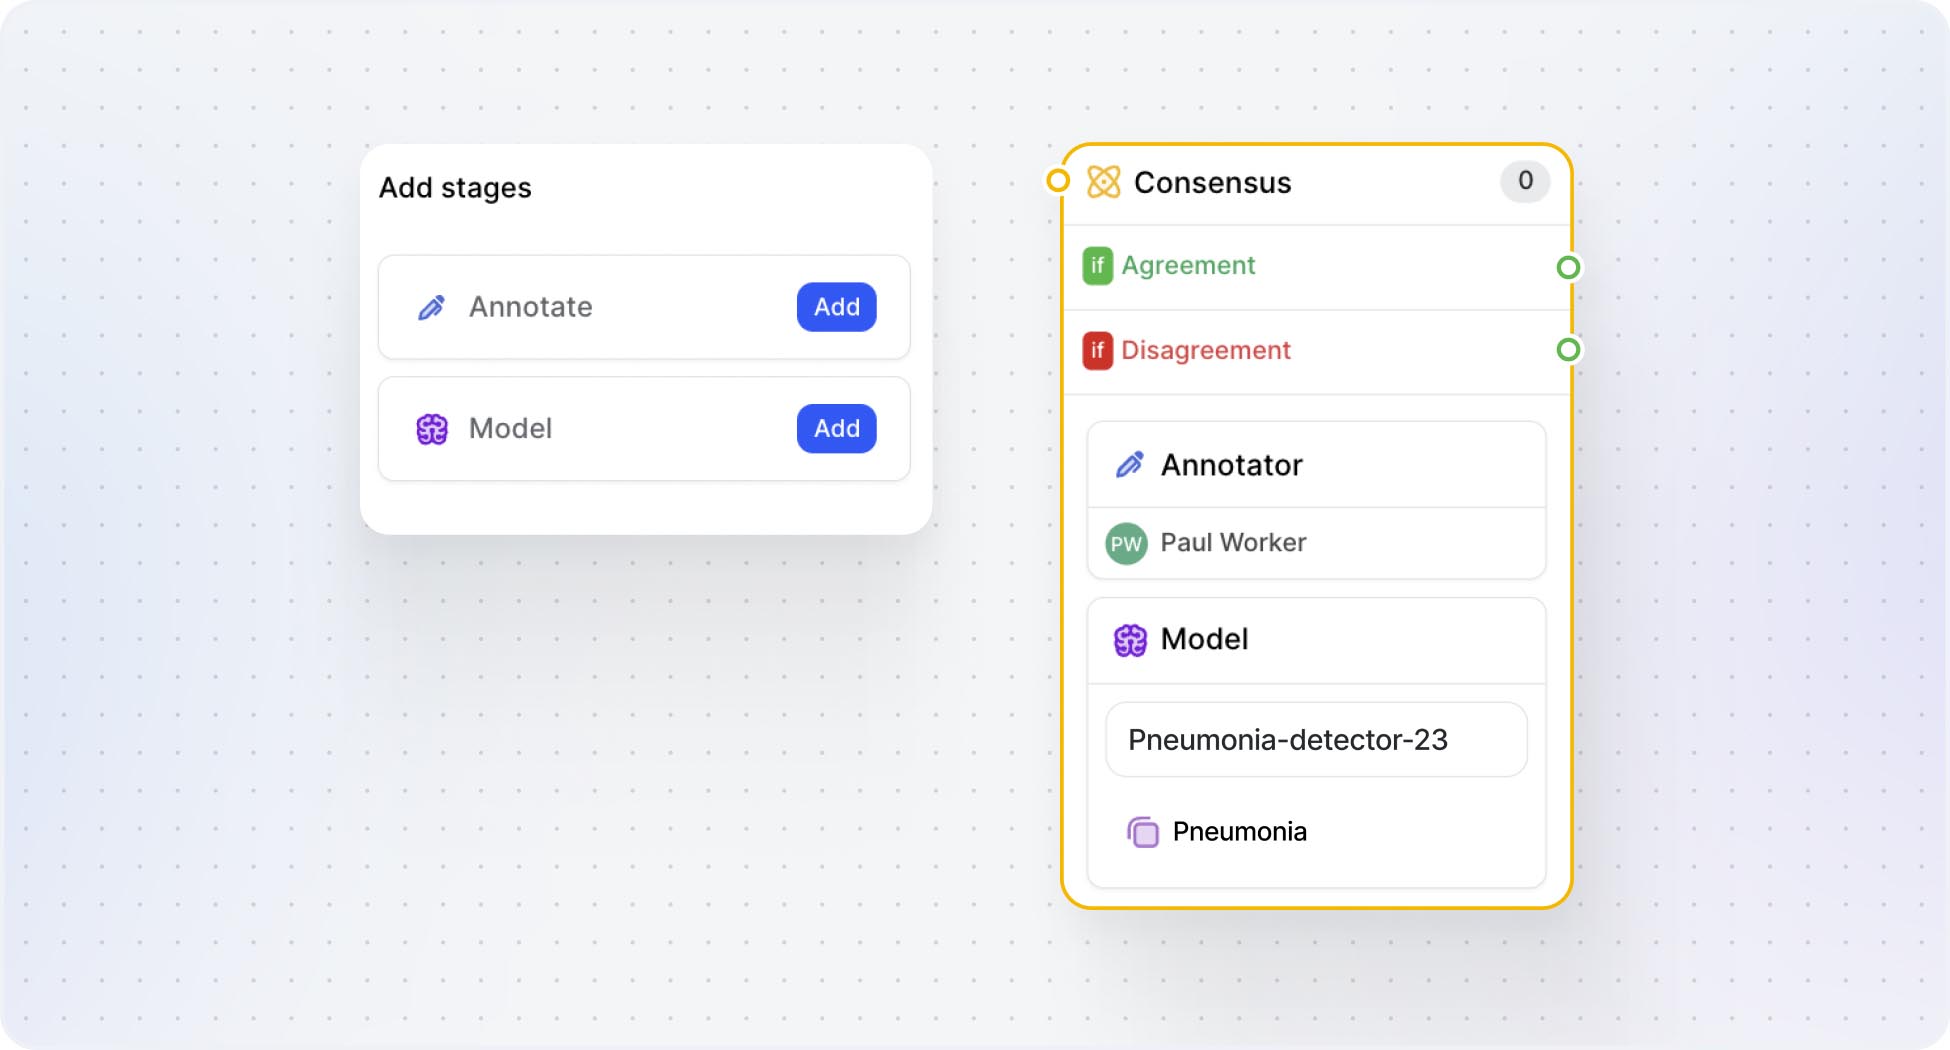
Pro tip: You can connect one of V7’s publicly available models or bring your own model.
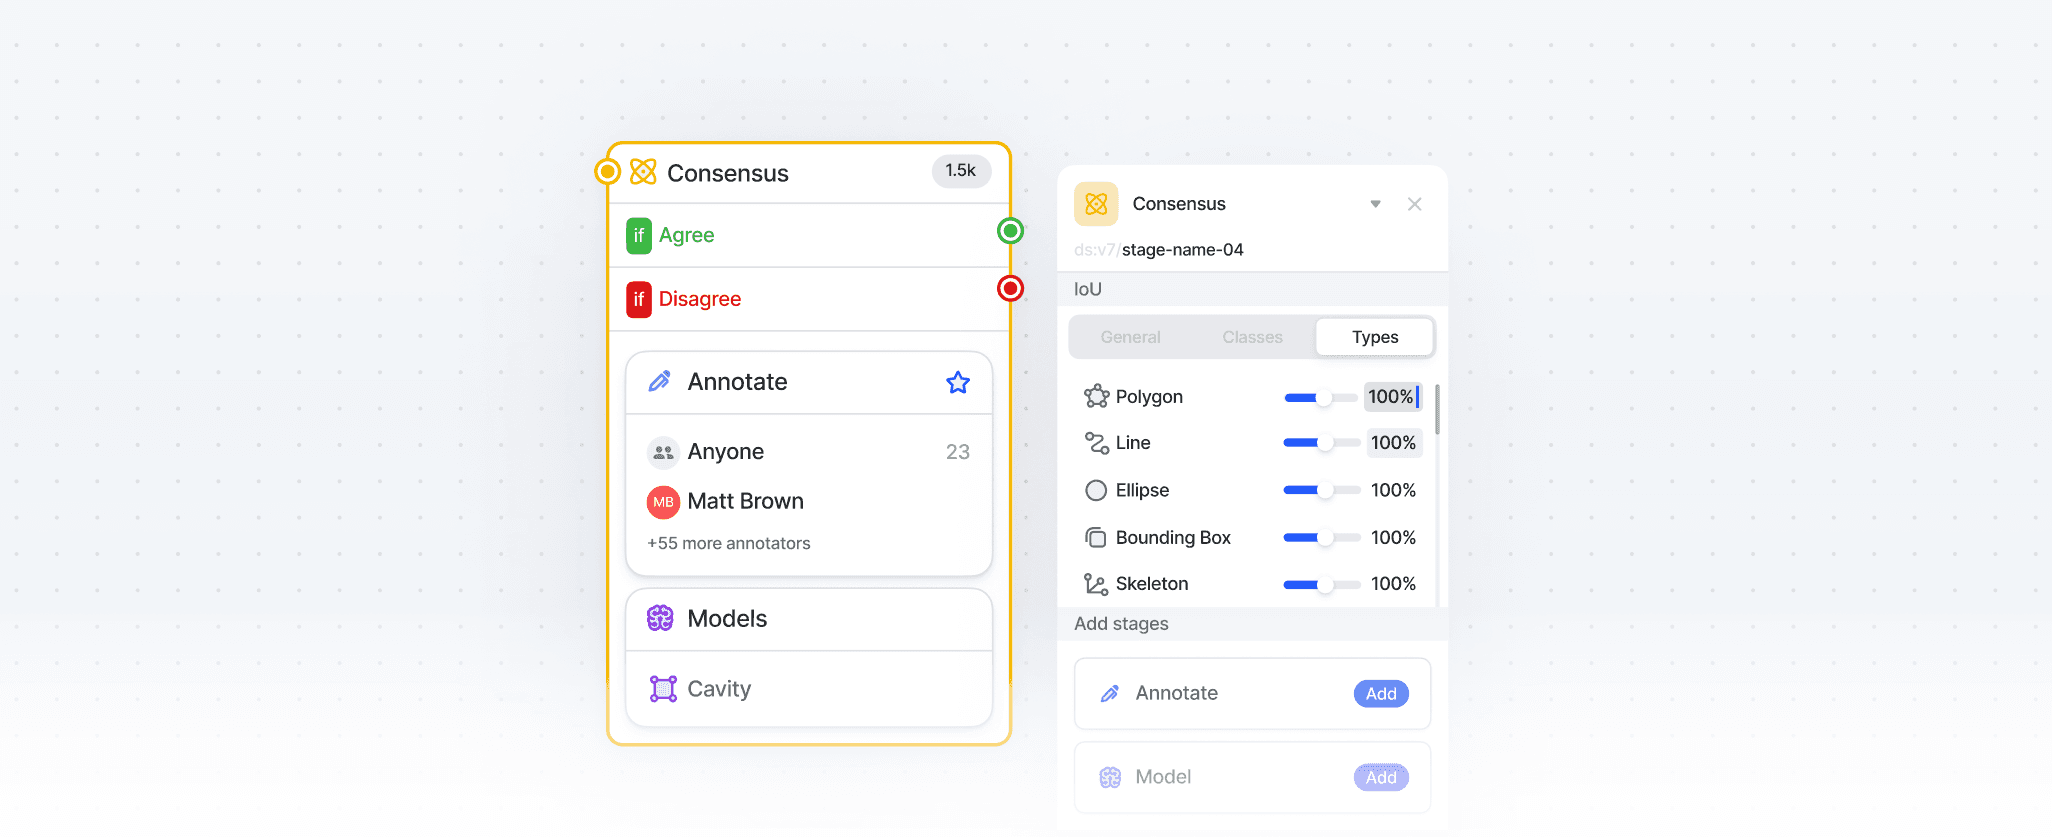
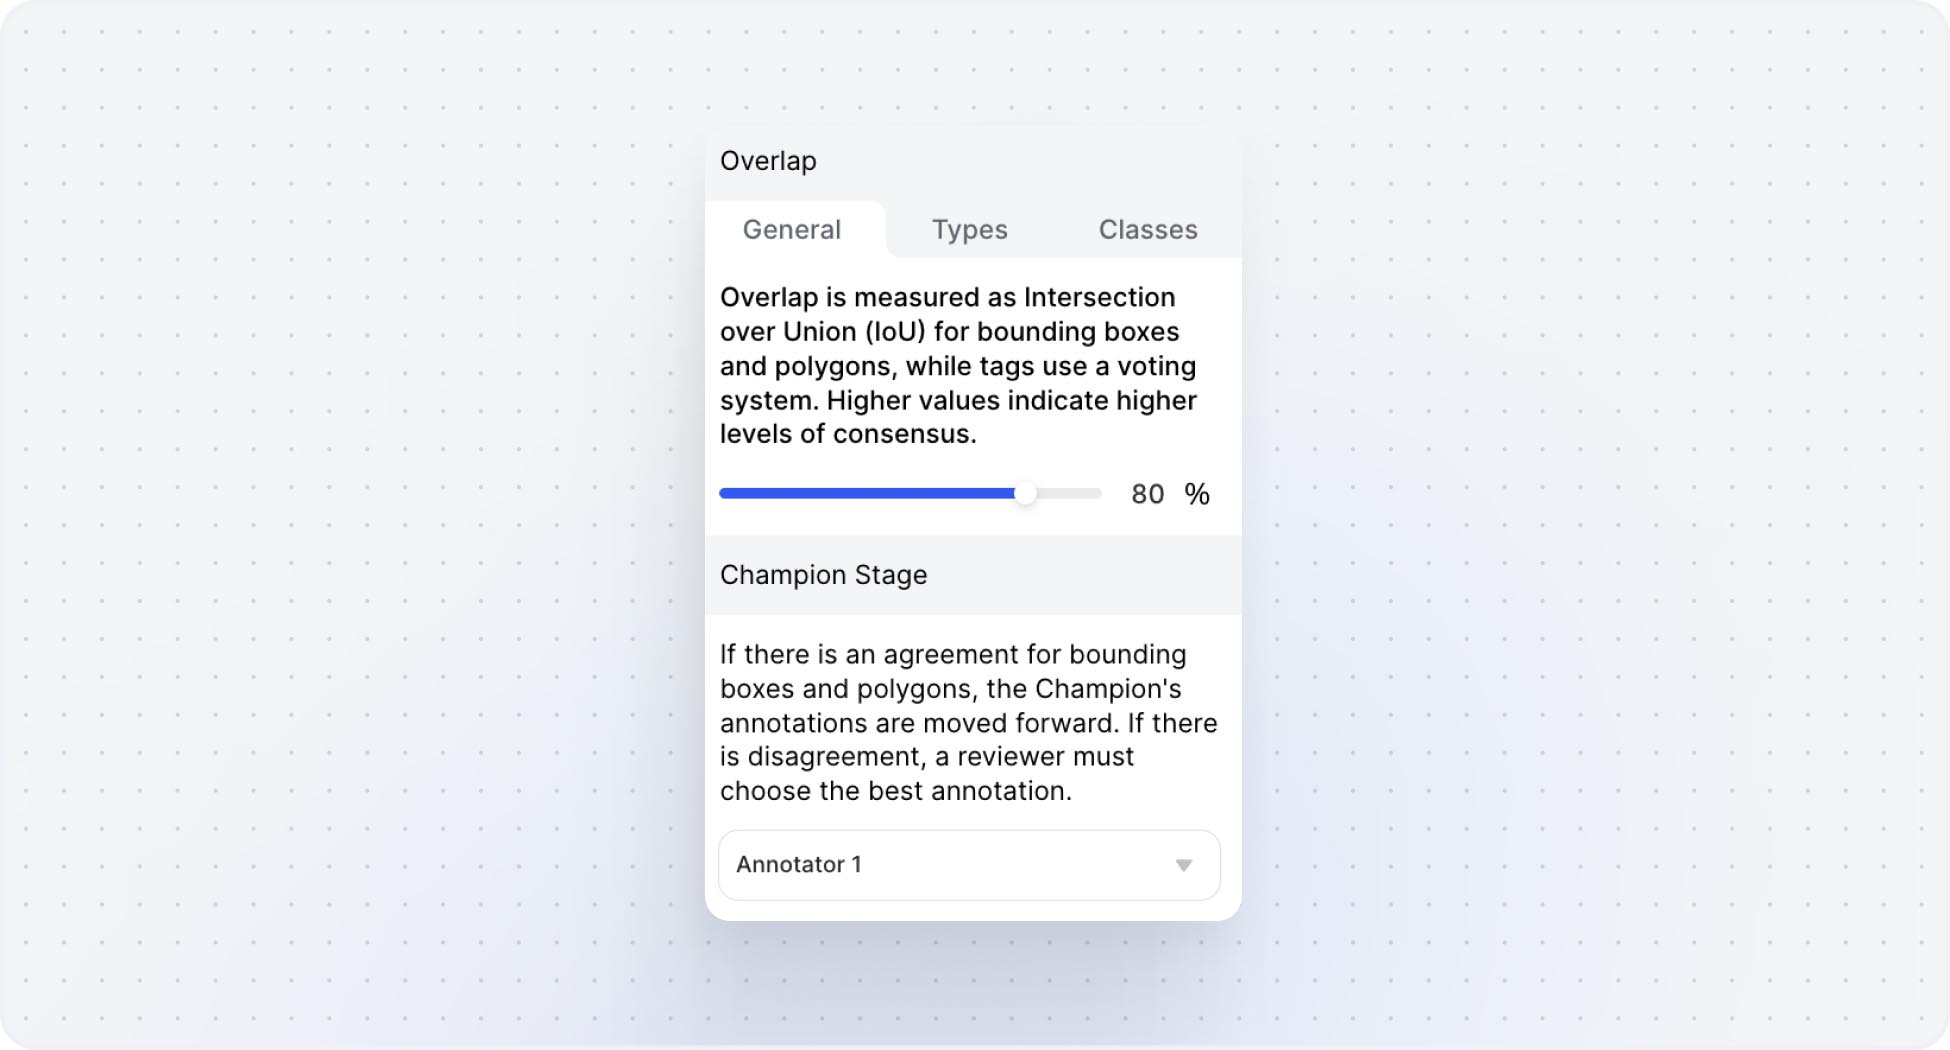
3. Next, configure the Consensus threshold, which specifies the minimum IoU score required for an item to automatically pass through the Consensus stage.
You can set up the Overlap threshold on 3 different levels:
a) General (Default) - globally for all annotations.
Example: When set to 80%, it means that if any given two annotations have 80% overlap, there’s an agreement, and one of them (Champion) automatically moves to the next stage in your workflow.
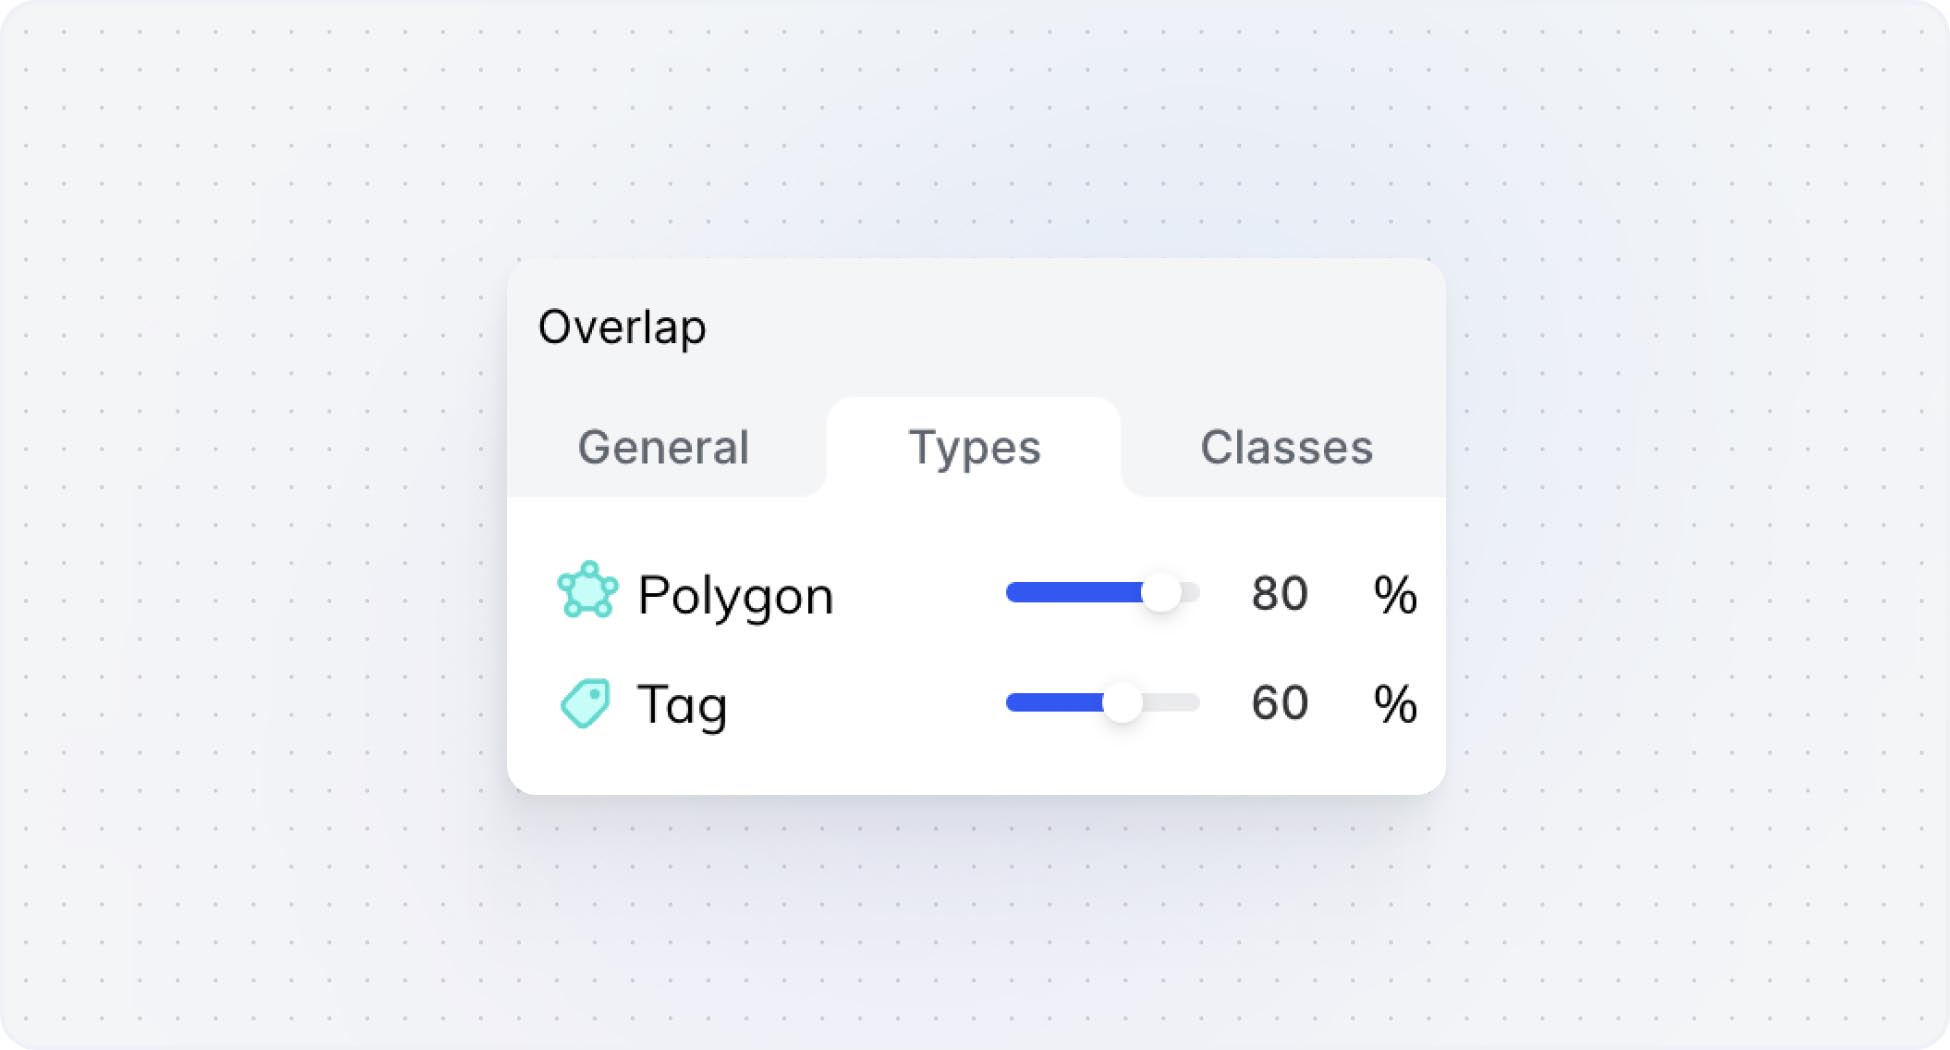
b) Annotation Types - based on the annotation types present in your data. It overwrites the “General” threshold, meaning that you can set up individual overlap values for every annotation type within your data.
Example: If a Polygon threshold is set to 80% and Tag threshold is set to 60%, the image where both annotators created a segmentation mask with 80% overlap, but added different tags (less than 60% overlap), the image will end up with a Disagreement that will need to be resolved in the review stage.
Note: Tags use a voting system, not IoU. It means that if you set the threshold to 60%, you would need 3 out of 5 (60%), or 2/3 (67%) (or some other >60% ratio), of annotators to add that tag for it to automatically go into Agreement path.
c) Classes - based on individual classes within your data. It overwrites the “General” and “Types” thresholds.
Example: In the case where there are 3 objects to be annotated in one image: Left lung, Right lung, Pneumonia, the failure to achieve the specified overlap threshold for any one of the individual classes will result in the disagreement, and the image being routed to the review stage.
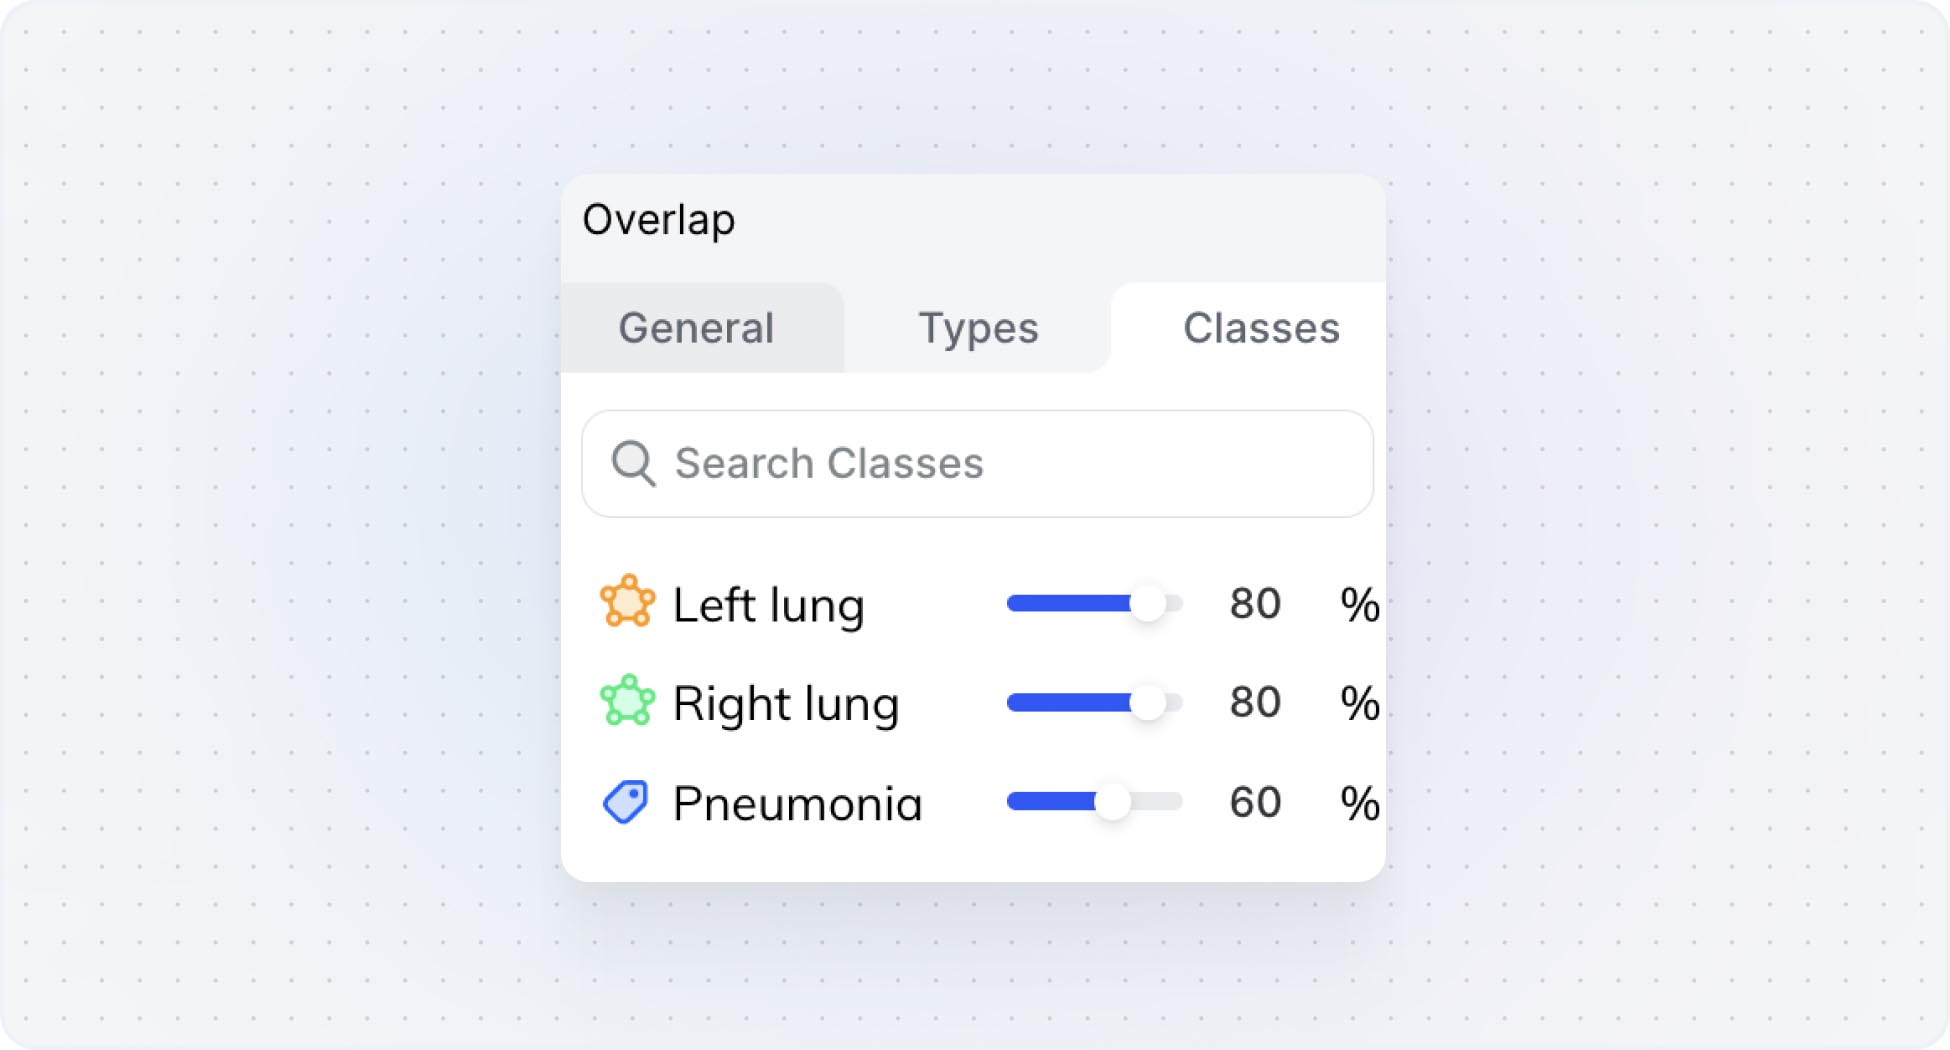
Tip: If you want to compare the performance of annotators/models only for specific classes in your dataset, you can adjust the overlap to 0% for the remaining classes, ensuring that they won’t block your image from automatically moving to the next stage once the agreement is reached.
4. Specify which model or annotator will act as your Champion. If an item automatically passes through a Consensus stage due to agreement, the Champion’s annotation is deemed as the ‘correct’ annotation, and is used moving forward.
5. Save your workflow and set it live. Your team is ready to start annotating!
How to Review Consensus Disagreements
V7 supports automated disagreement checking for:
Bounding Boxes (IoU)
Polygons (IoU)
Tags (voting)
V7 allows you to use the consensus stage for blind parallel reads (without automated disagreement checking) for the following classes:
Polylines
Ellipses
Keypoints
Keypoint Skeletons
Automated review: Polygons, bounding boxes, tags
After all annotators and/or models have added their annotations, the disagreements can be reviewed in a review stage. Head over to the Datasets tab to access files that were sent to the review stage.
Once you are in the workview, you’ll notice the annotations created by both parties and the IoU (Intersection Over Union) value, indicating the degree of the overlap between the annotations.
1. Open the Issues tab and view Disagreement by clicking on it in the sidebar.
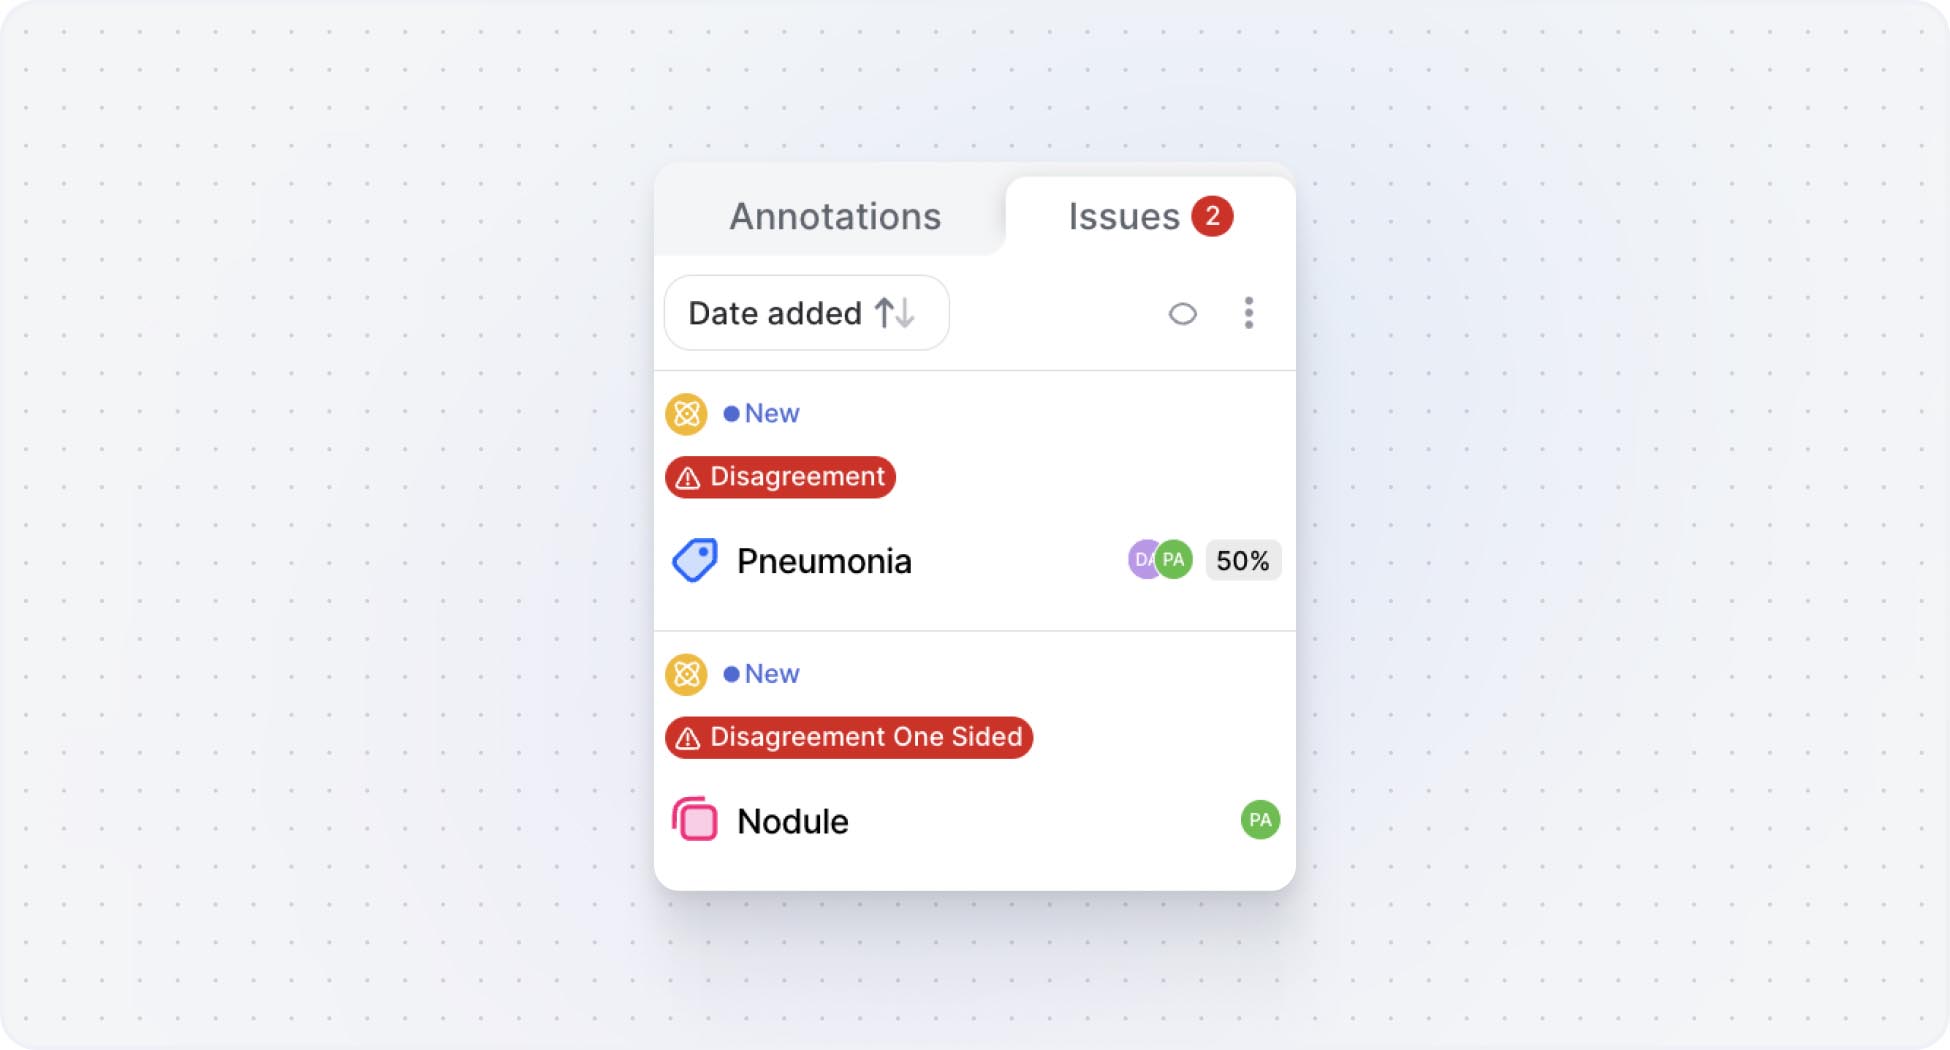
2. Either Accept a single annotation or delete other annotations in the Disagreement until you are left only with the “winning” annotation.
3. To resolve a one-sided disagreement (a disagreement where an annotator added a bounding box or polygon to a place where others did not), either delete the annotation or use the comment tool to click on the one-sided disagreement and click “resolve comment”.
Manual review: Polylines, elipses, keypoints & keypoints skeletons
You can add polylines, elipses, keypoints & keypoints skeletons to a parallel annotation stage in consensus, but V7 currently does not automatically surface the disagreements in the image.
The reviewer needs to manually scan the images to identify the inconsistencies and move the file to the next stage.
Pro tip: Check out this video on how to set up Consensus with Model Assisted Labels for Polylines with Blind Parallel Review.
Supported format for the Consensus Stage
V7's consensus stage is compatible with images, videos, DICOMs and PDFs, for any number of annotators and/or models.
Consensus stage use cases
The Consensus stage can be used in a plethora of use cases - especially in medical data workflows. Below are a couple of examples of real-life projects where the consensus stage could be applied to support the creation of high-quality training data more efficiently.
Pro tip: Got a medical AI use case you’d like to solve? Check out V7 for AI Healthcare teams.
Annotator vs. annotator performance
Use case: Resolving disagreements between experts & improving classes understanding
Data accuracy is particularly critical for healthcare AI teams, and the FDA requires consensus mechanisms in medical product development workflows. In this case, we’ll look at the annotations created on the dental dataset where two experts disagreed.
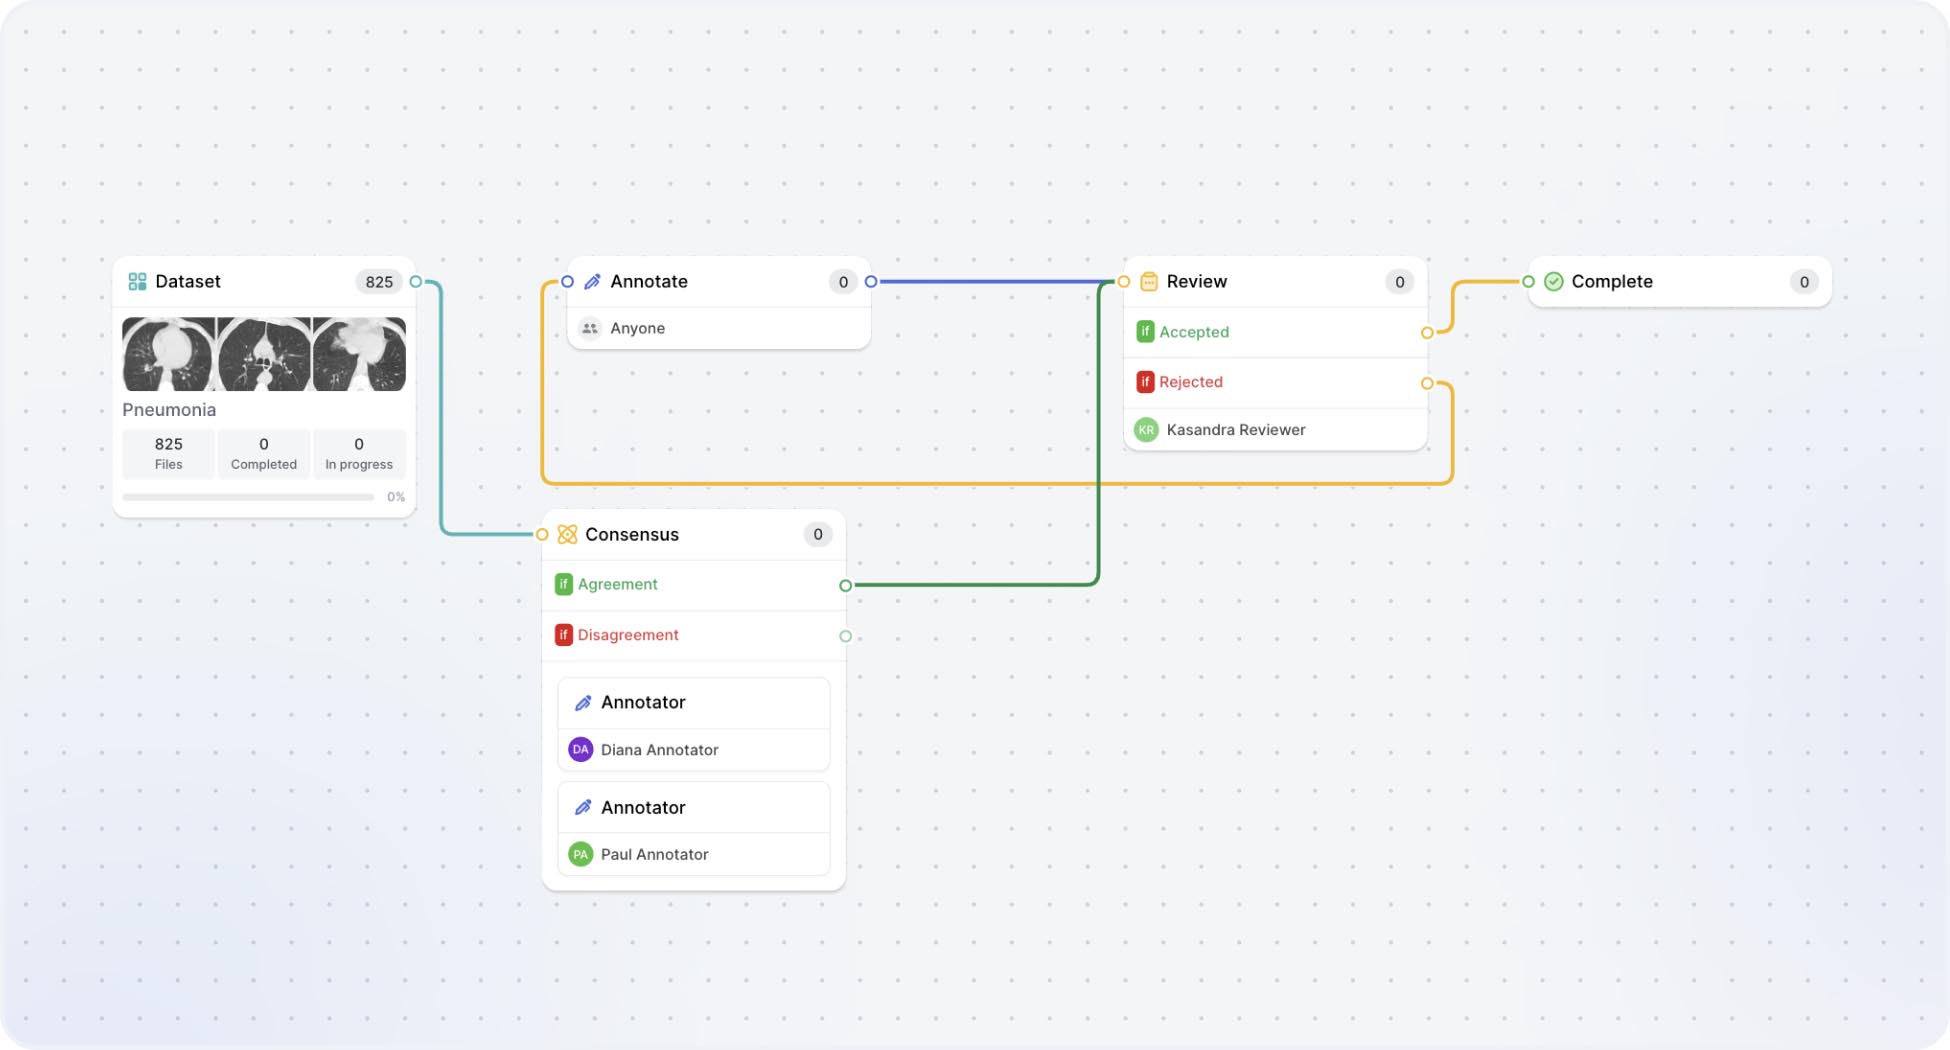
Here’s the workflow used for this example.

The overlap threshold was specified to be 80% across all classes, and Annotator 1 was set as our Champion - meaning that in case of agreement, the annotations made by Diana Annotator will be passed onto the Complete stage.
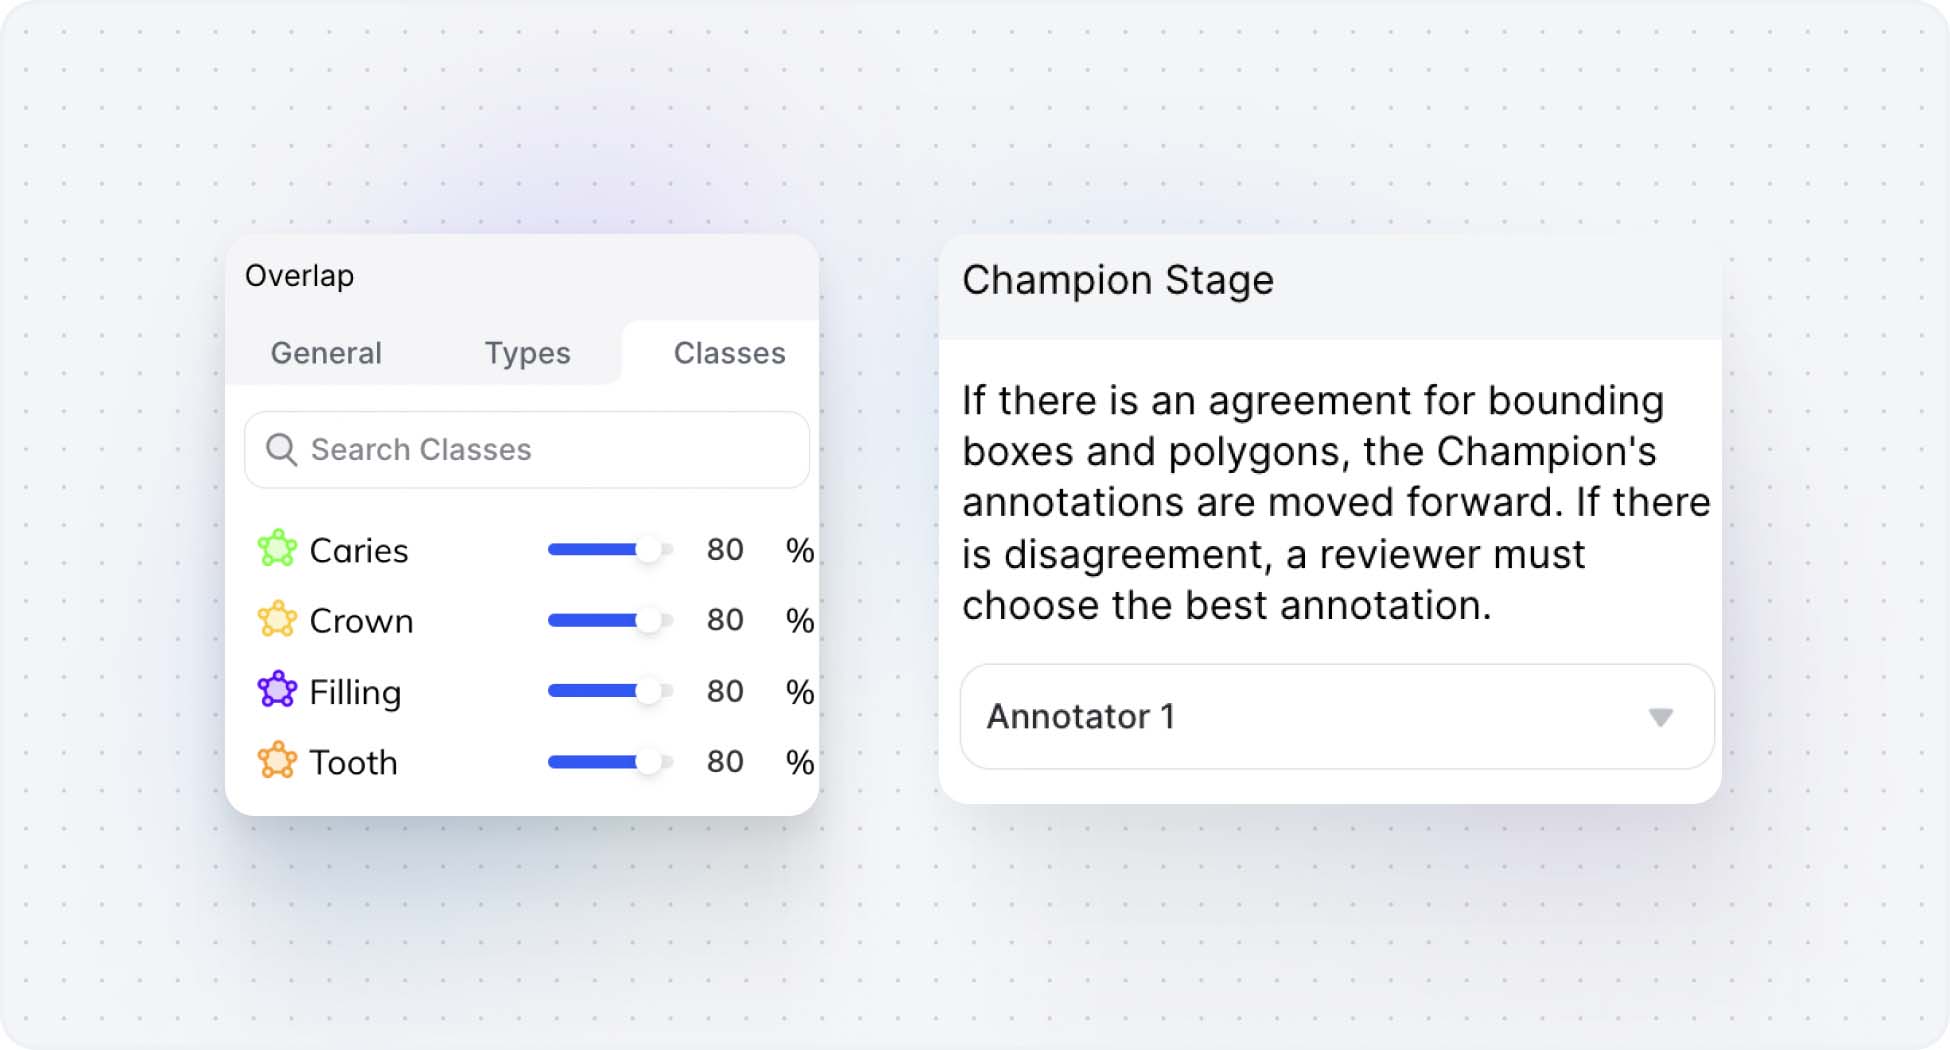
After Paul Annotator and Diana Annotator completed all the annotations, a few images ended up in a review stage. Below is an example of an image with identified disagreements between two experts.
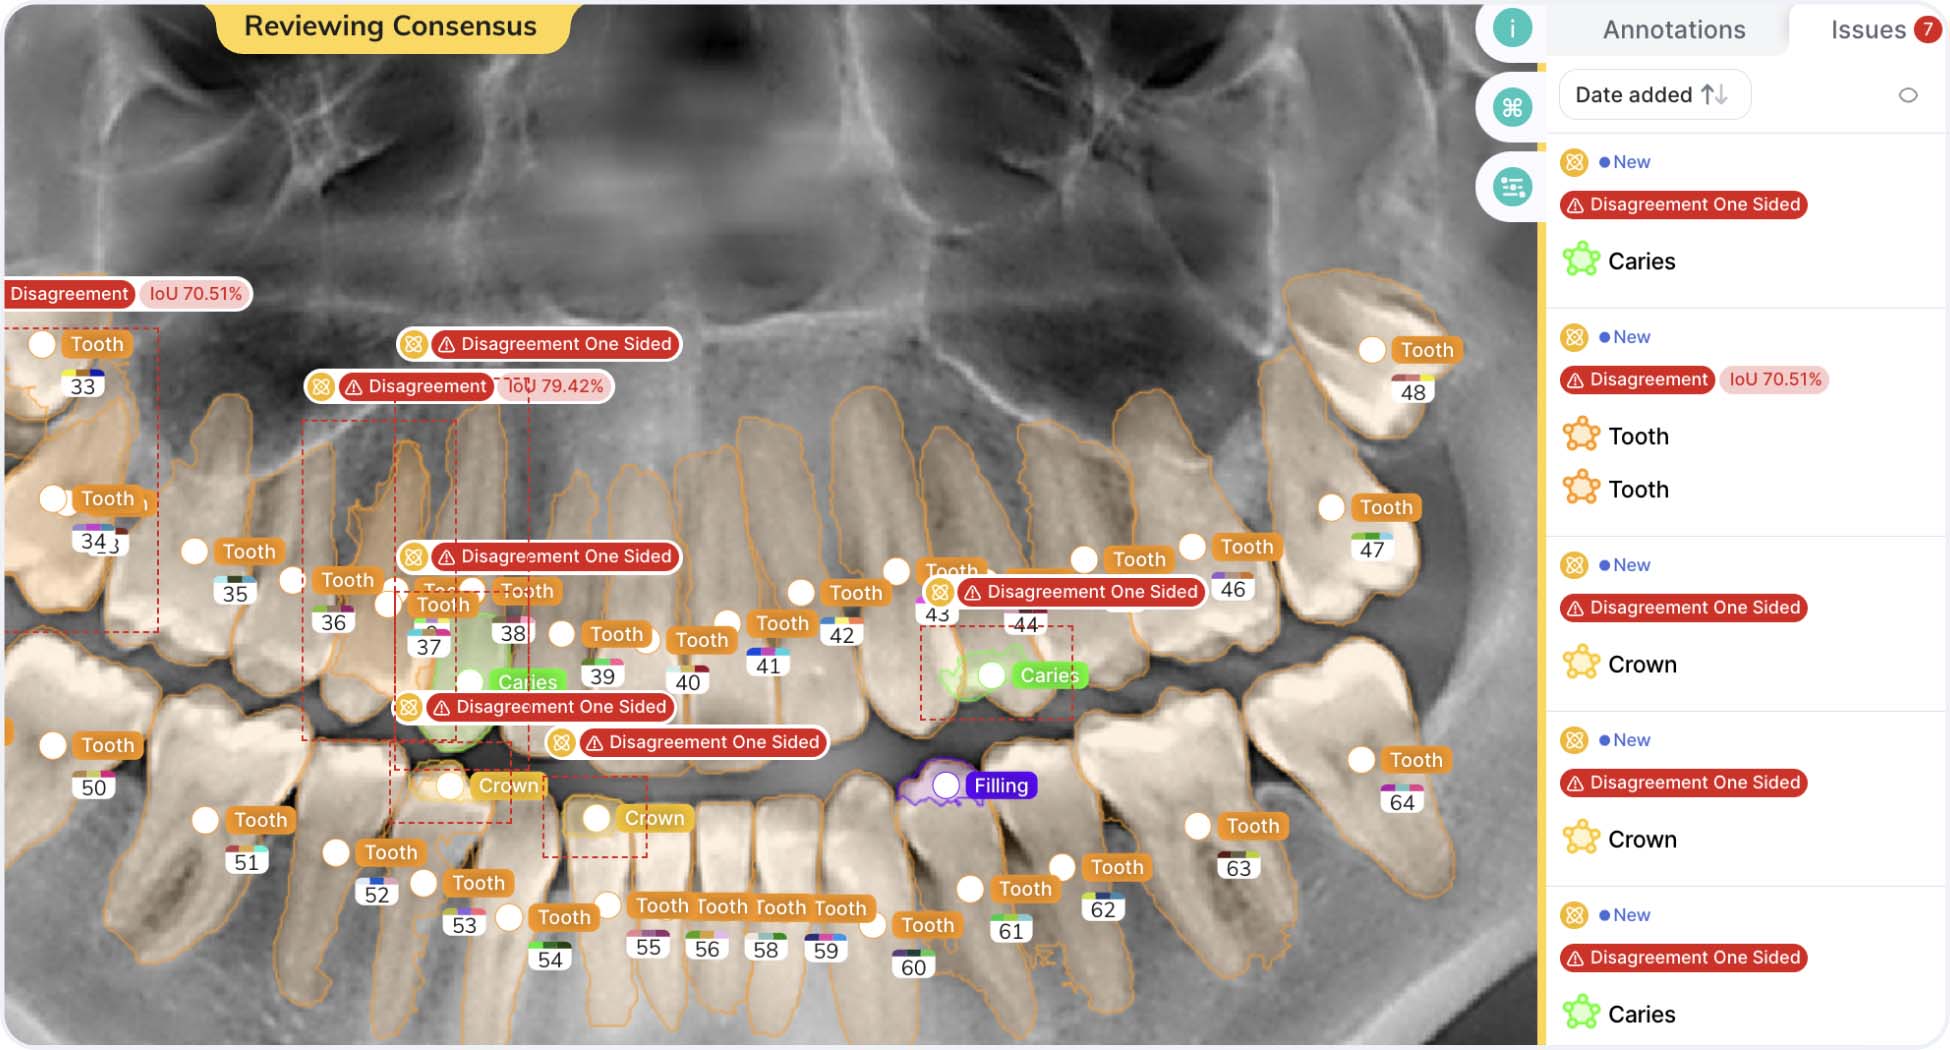
As you can see, the image contains two types of disagreements.
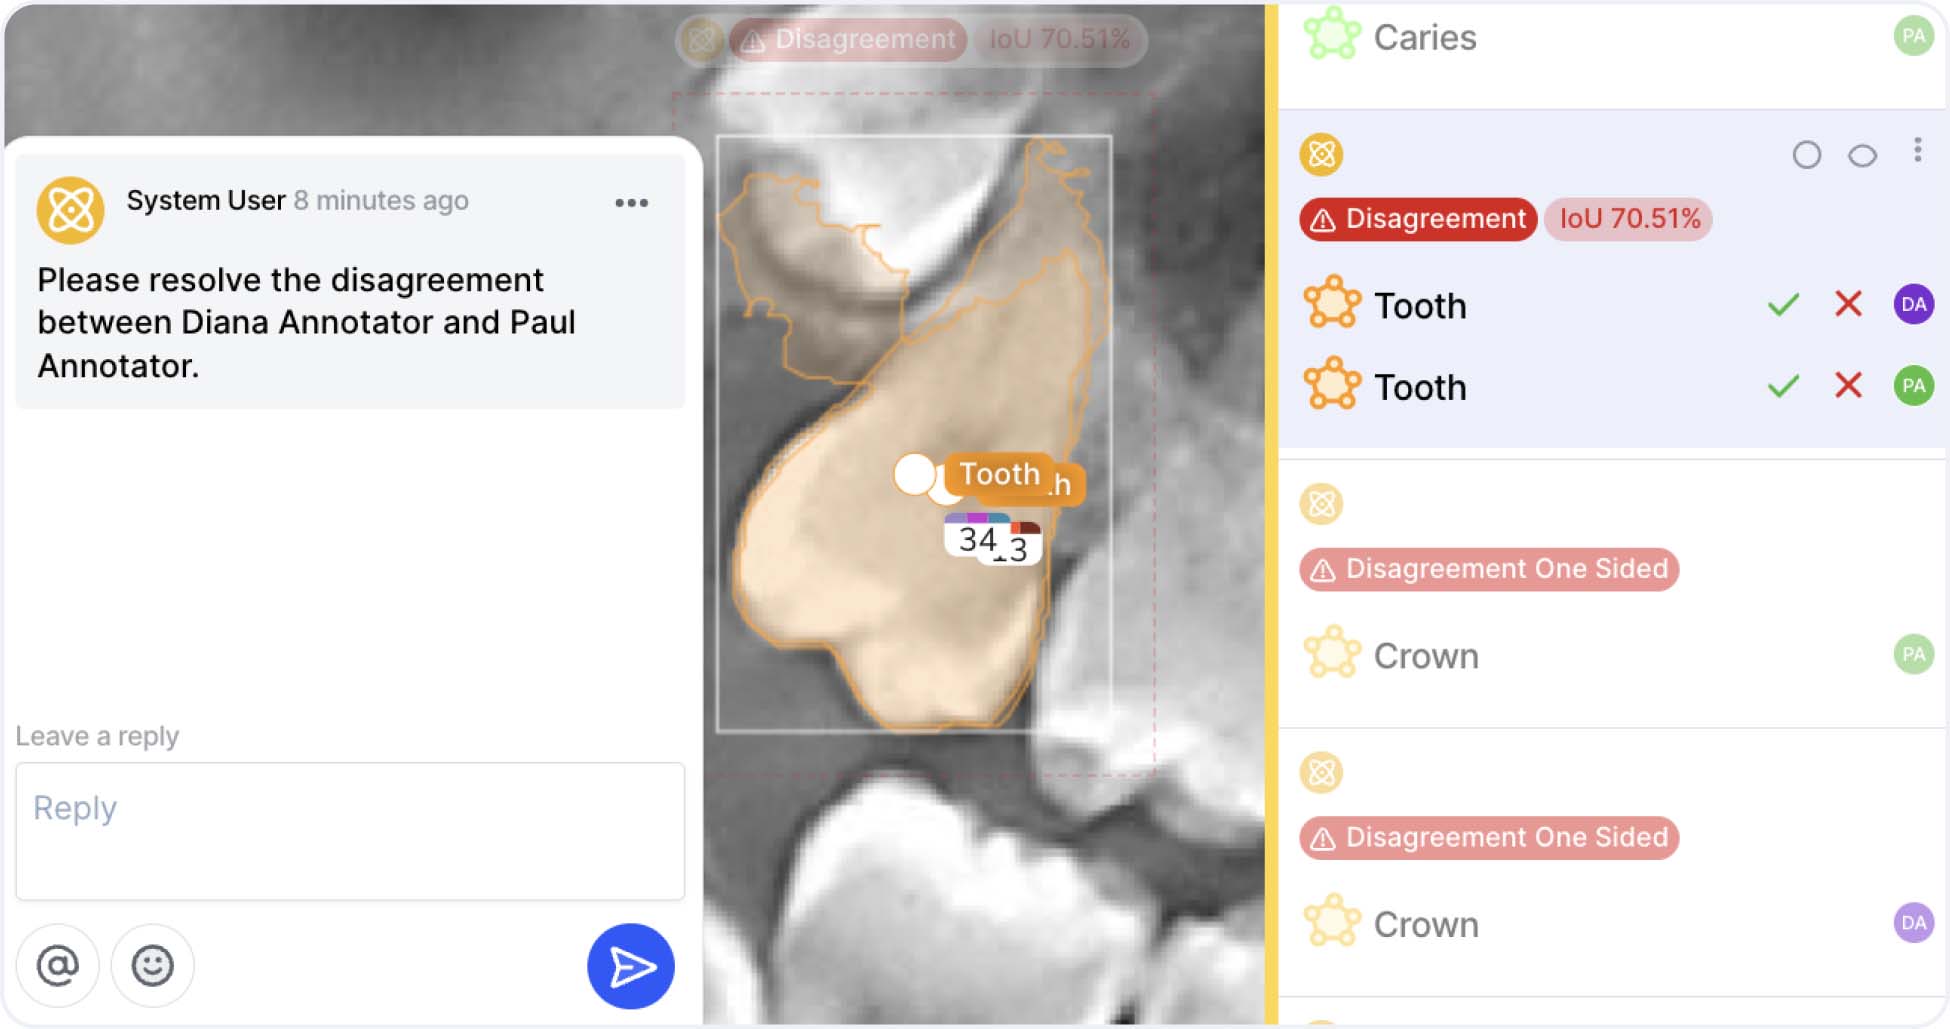
Example 1: Disagreement where both annotators created annotations, but did not achieve the minimum overlap threshold.
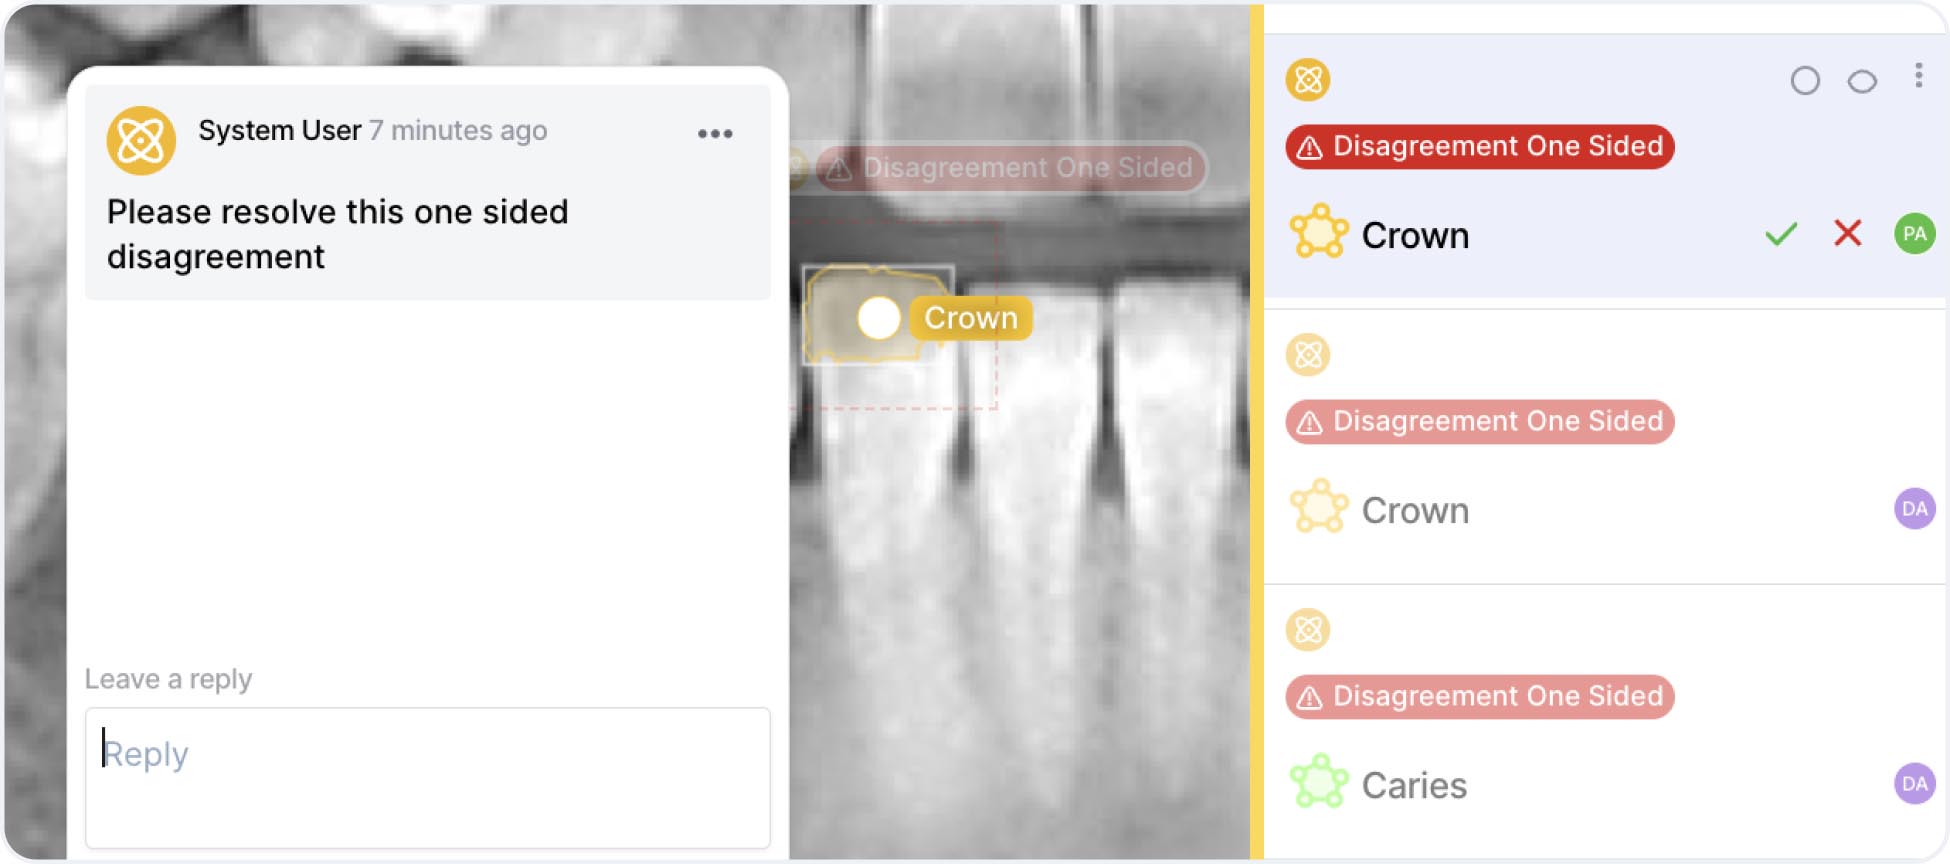
Example 2: One sided disagreement where only one annotator created a given annotation.
Each disagreement needs to be reviewed and resolved by the reviewer either by accepting or discarding the chosen annotation so that it can move to the next stage (in case of Accepted annotations → Complete, and Rejected annotation → Annotate).
You can also add comments about the labelings issues and misunderstandings of classes to guide your annotators towards improving the quality of their annotations in the future.
Annotator vs. model performance
Use case: Active learning & spotting human-made errors
The Consensus stage enables you to compare the performance of annotators and computer vision models and conduct quality checks on the created annotations. By doing so, you can monitor the consistency and accuracy of labeled data and detect potential errors or biases.
This set up is also useful for understanding where your model is struggling and what kind of data you should collect to re-train it and improve its performance.
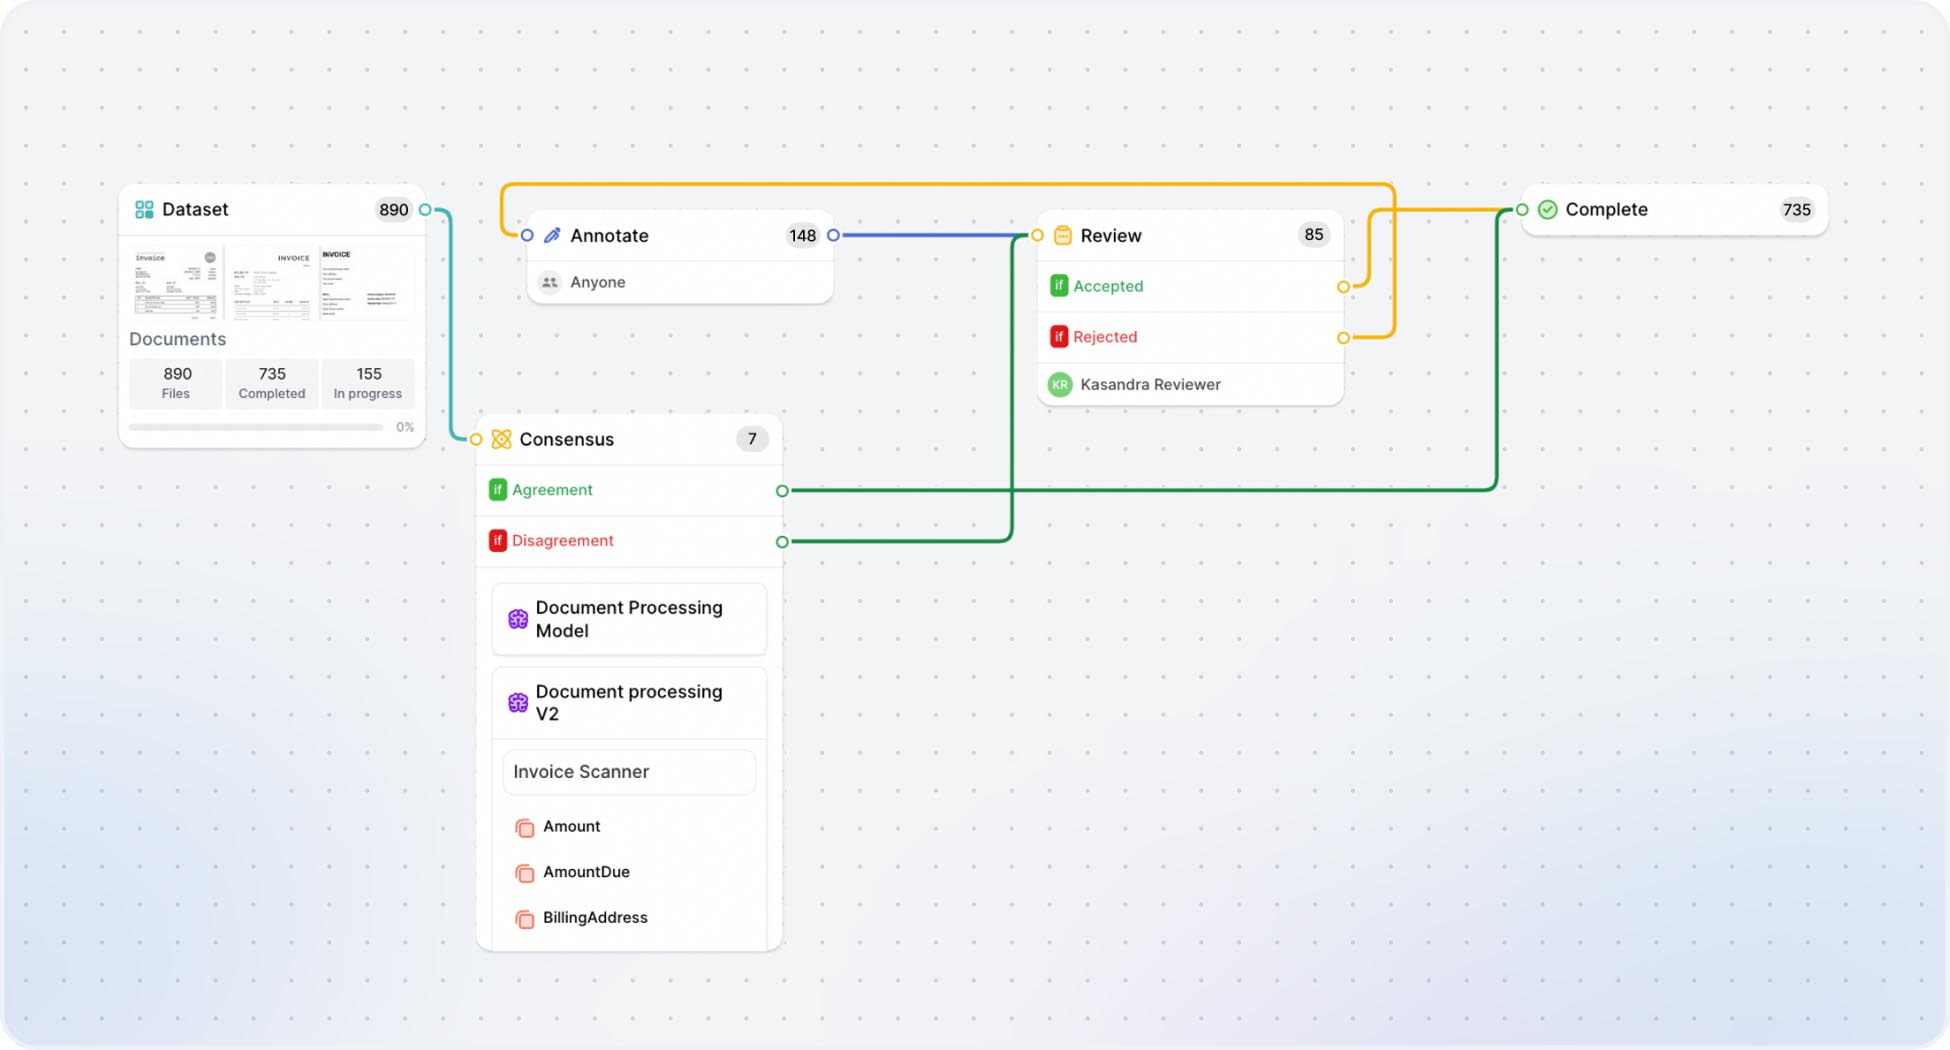
Here’s the example of the workflow with model and human in the Consensus stage.
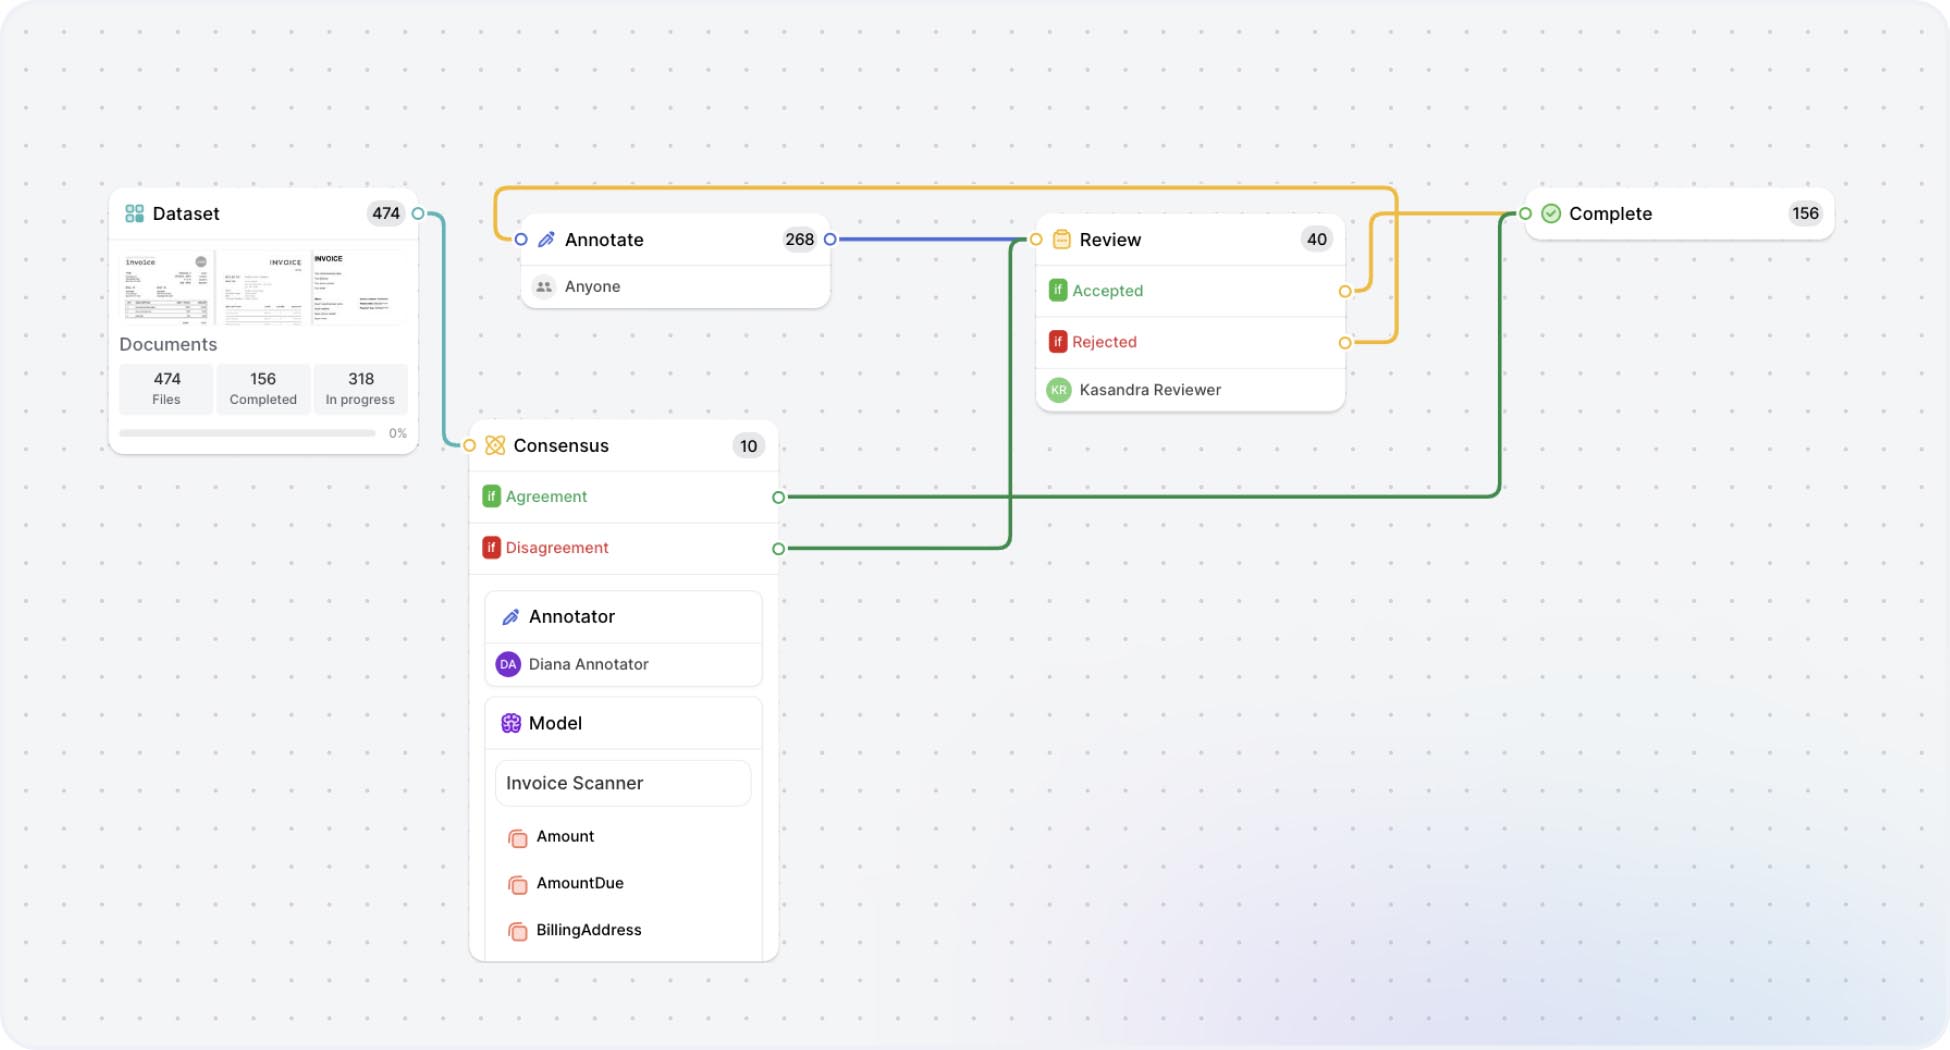
Watch the tutorial on How to Set Up the Annotator-Model Consensus Stage.
Model vs. model performance
Use case: Comparing independently trained models
You can also use the Consensus stage to compare the performance of two models - for example trained using different architectures. This will allow you to surface any disagreements and highlight data where models are struggling.
In the example below you can see two distinct Document Processing Models. Running a consensus stage makes it easier to understand visually how they differ and what are the strengths and weaknesses of each one.
