Data labeling
Keypoint Annotation: Labeling Data With Keypoints & Skeletons
12 min read
—
Mar 27, 2023
Learn how keypoint skeletons and keypoint annotation can enhance your training. Explore tools and best practices for skeleton-based labeling techniques

Content Creator
Are you interested in using keypoints for monitoring the behavior of livestock with the help of AI? Or, maybe, you need to track the movements of an industrial robot using a multiple-joint keypoint skeleton?
If you want to create high-quality training data for your computer vision models, keypoint annotation is the way to go. This technique allows you to label specific objects and identify their position, movement, or spatial relationships with pinpoint accuracy.
However, if you are not familiar with some core concepts related to keypoint annotation, it is easy to make some beginner mistakes. That can cost you a lot of time and resources. Before you start using keypoints, read this guide.
We will discuss keypoint annotation in detail. You’ll learn about its applications, challenges, and significance in training state-of-the-art computer vision models.
In this article:
Keypoint annotation—definition
Use cases and challenges
How to annotate data with keypoints
Best practices for keypoint annotation
You can also dive right in and try out our keypoint annotation tool:
Ready to speed up your annotation process and build custom data workflows? Jump to:
What is keypoint annotation?
Keypoint annotation involves labeling specific landmarks on objects in images or videos to identify their position, shape, orientation, or movement. Multiple keypoints can be connected to form larger structures known as keypoint skeletons.
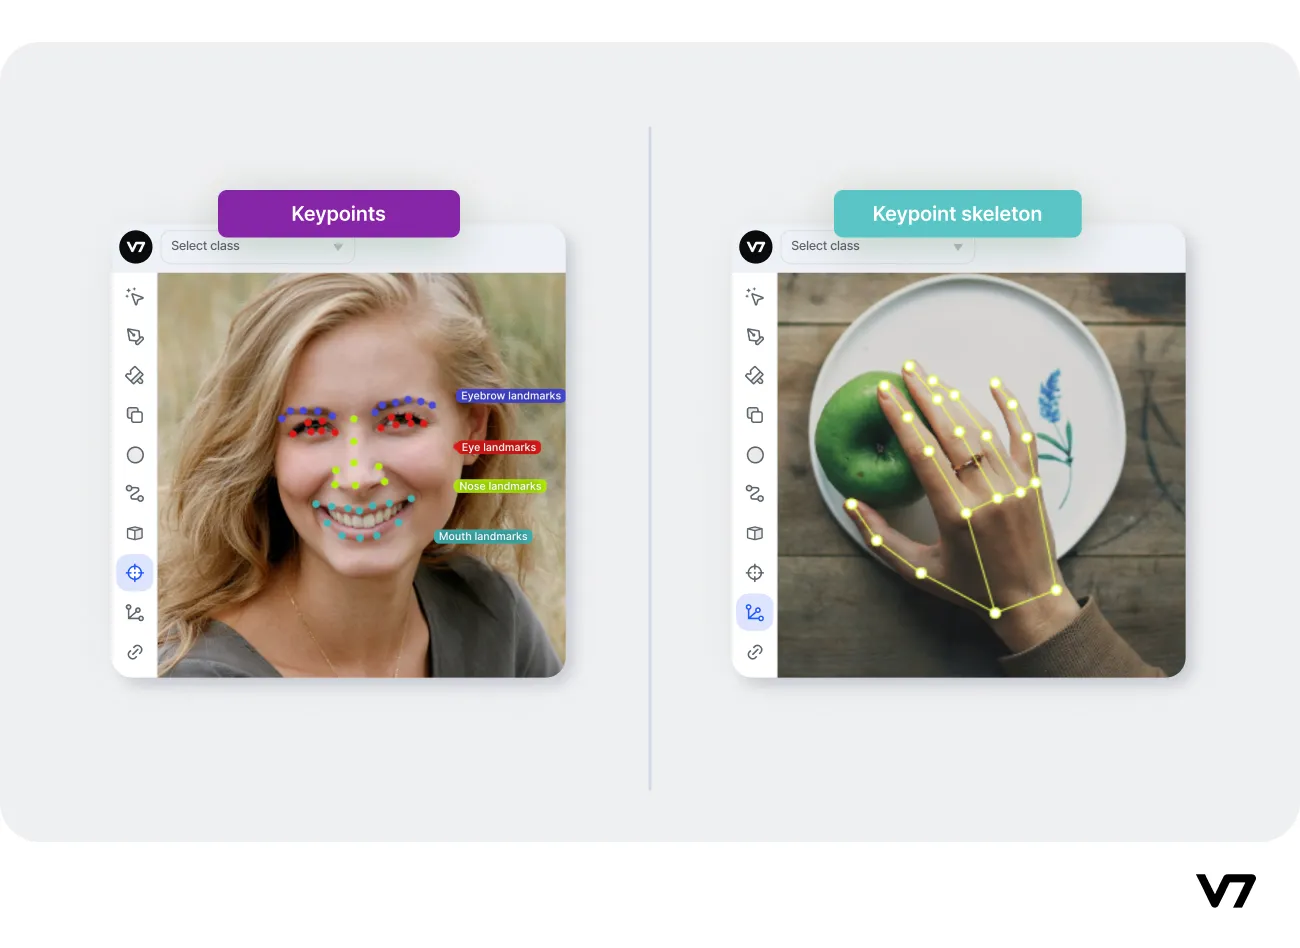
Keypoints can represent various aspects of the image, such as corners, edges, or specific features, depending on the application. For example, in facial recognition, they can mark the eyes, nose, and mouth, while in human pose estimation, keypoints can represent the joints of the body.
Using keypoints is one of the most accurate annotation methods. They are a great way to prepare training data for:
Facial expression recognition
Human and animal pose estimation
Navigation and driver behavior analysis
Livestock behavior tracking
Hand gesture recognition
Robotics and manufacturing
Video surveillance
Sport analytics
3D reconstruction
With datasets including keypoint annotations, your models get a more nuanced understanding of the spatial relationships between different objects or structures within each image. This lets you solve more complex computer vision tasks and make better predictions.
But how is keypoint annotation different from other data annotation types?
Let’s compare a keypoint skeleton annotation of a baseball player with a polygon annotation of the same image.
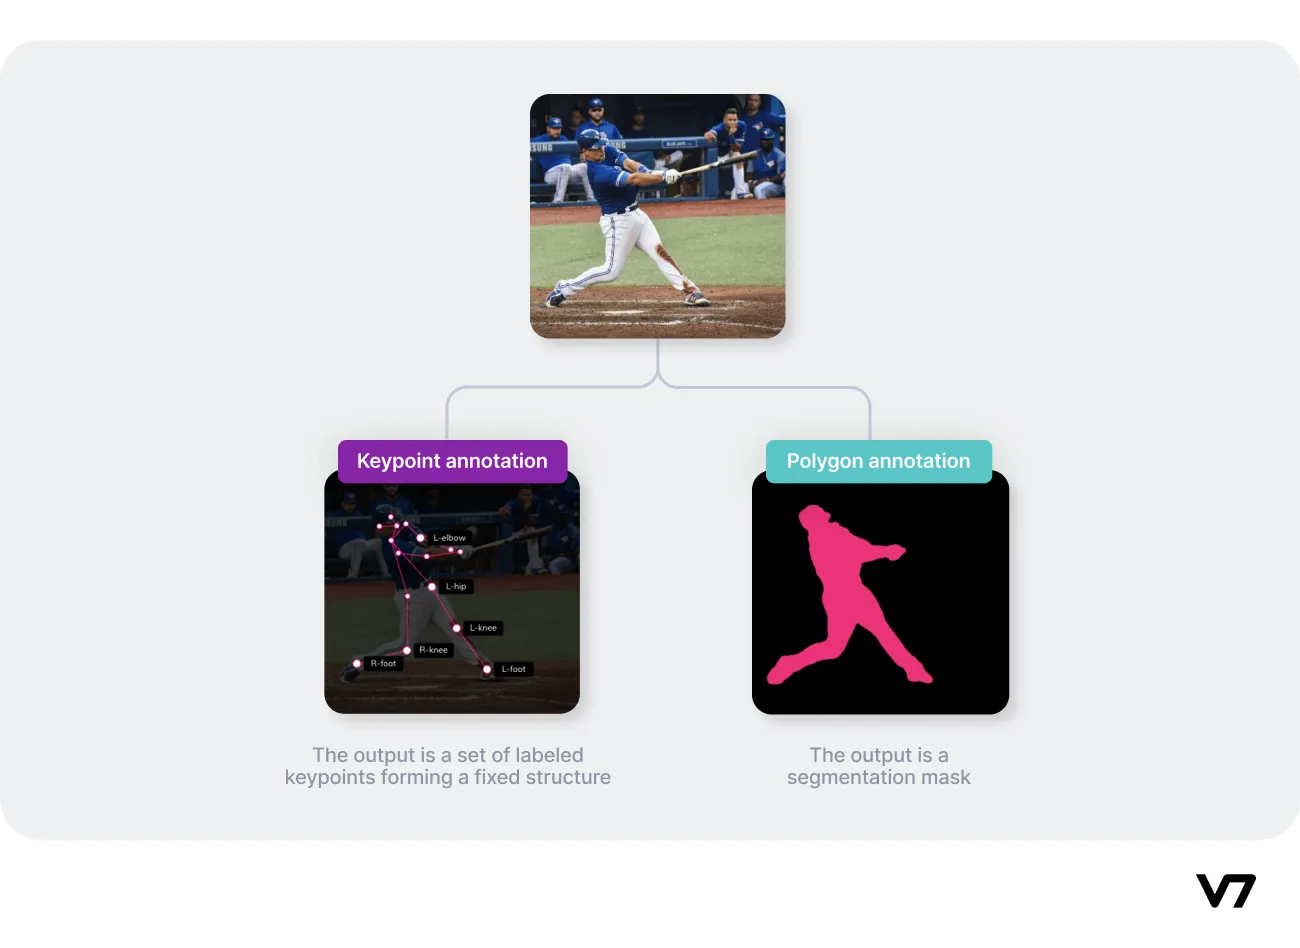
Annotation: Human Keypoint Sample
With keypoint skeletons each point is unique and represents a specific landmark, joint, or edge.
Polygon annotations, on the other hand, only delineate the area of interest to create an instance segmentation mask. We know which parts of an image belong to our main object, which part is the background, and nothing more.
Some types of keypoint skeletons may seem strikingly similar to simple polygon annotations. Take a look at the examples below:
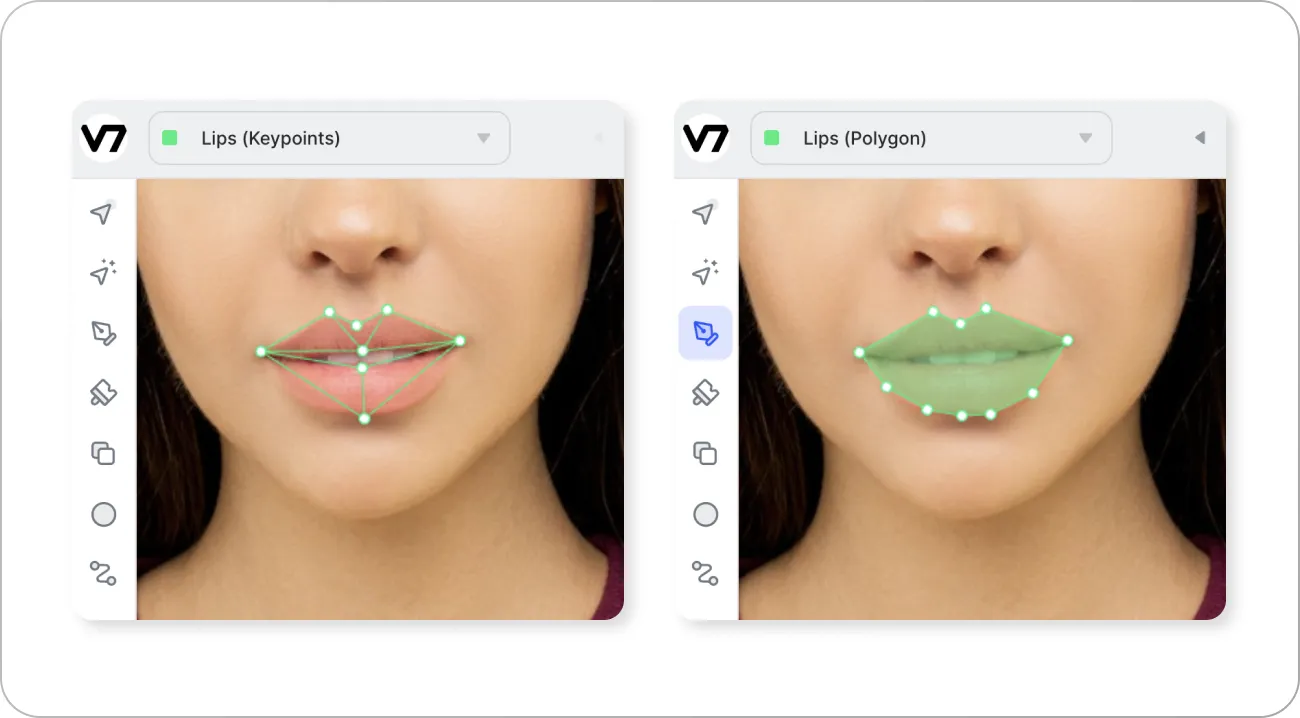
While both annotations look somewhat alike, they are actually very different. The first one includes information about the position of specific points of interest. For instance, point number 1 represents the left corner of the mouth and points 2-3-4 are used for marking the shape of the Cupid’s bow.
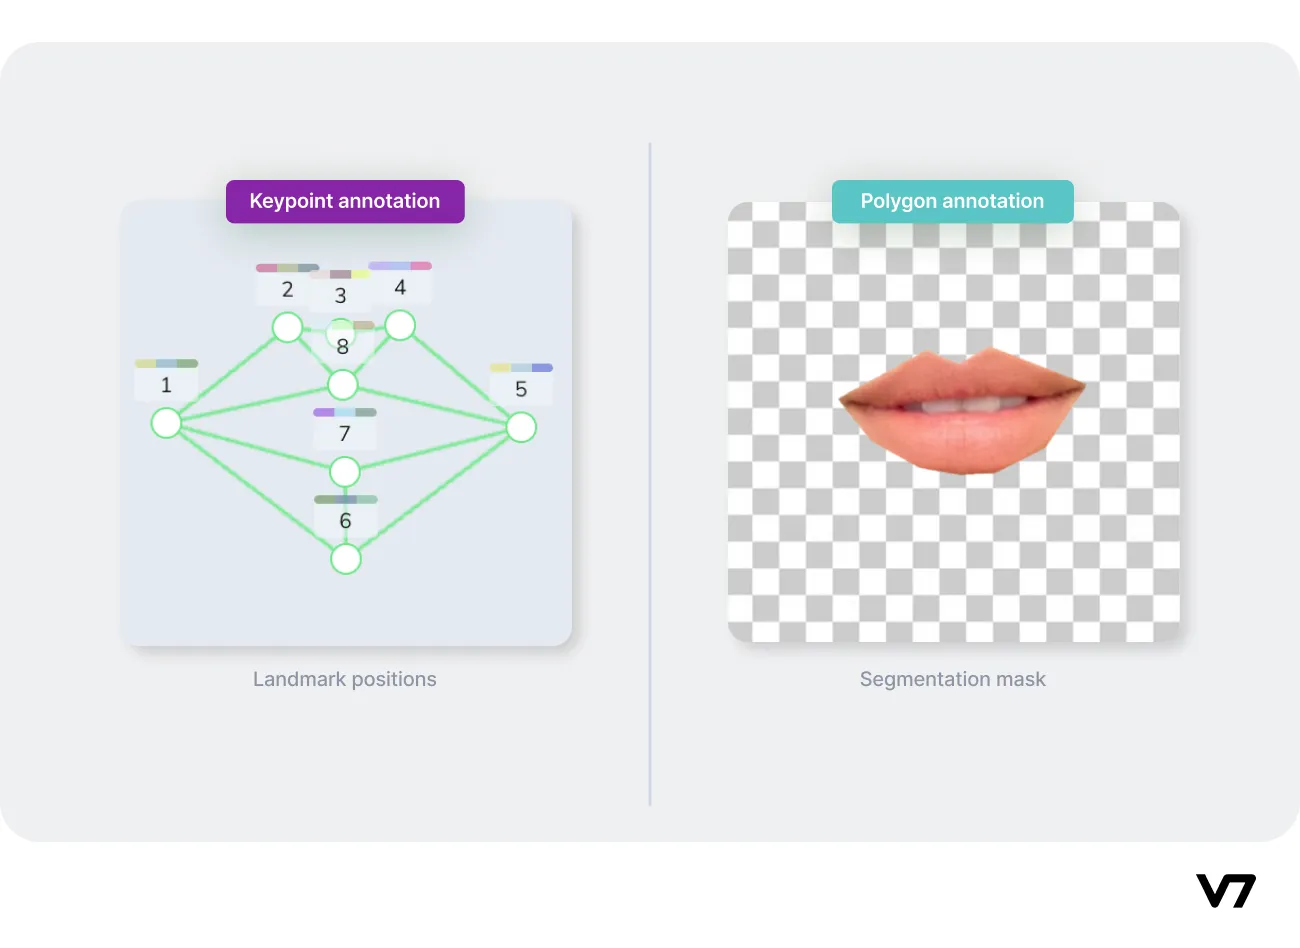
The structure remains the same and we can reuse the same keypoint skeleton to annotate multiple images.
Conversely, the polygon annotation on the right doesn’t include this information and the number of points may vary across different images and frames of the dataset. The points are not “key” points—they don’t represent anything in particular other than the general shape of the polygon segmentation mask.
When to use keypoint annotation
Keypoint annotation is used in some of the most challenging computer vision tasks. For instance, keypoints and keypoint skeletons are essential for human pose estimation or gesture recognition because these tasks require more precision and detailed data.
Keypoint regression involves predicting the coordinates of keypoints within an image or video frame. A keypoint regression model will predict the precise location of specific keypoints within that image or frame. This technique, along with keypoint detection, is often used in motion tracking.
Keypoint annotations are also perfect for analyzing spatial relationships between multiple objects or particles, for example football players on the field.
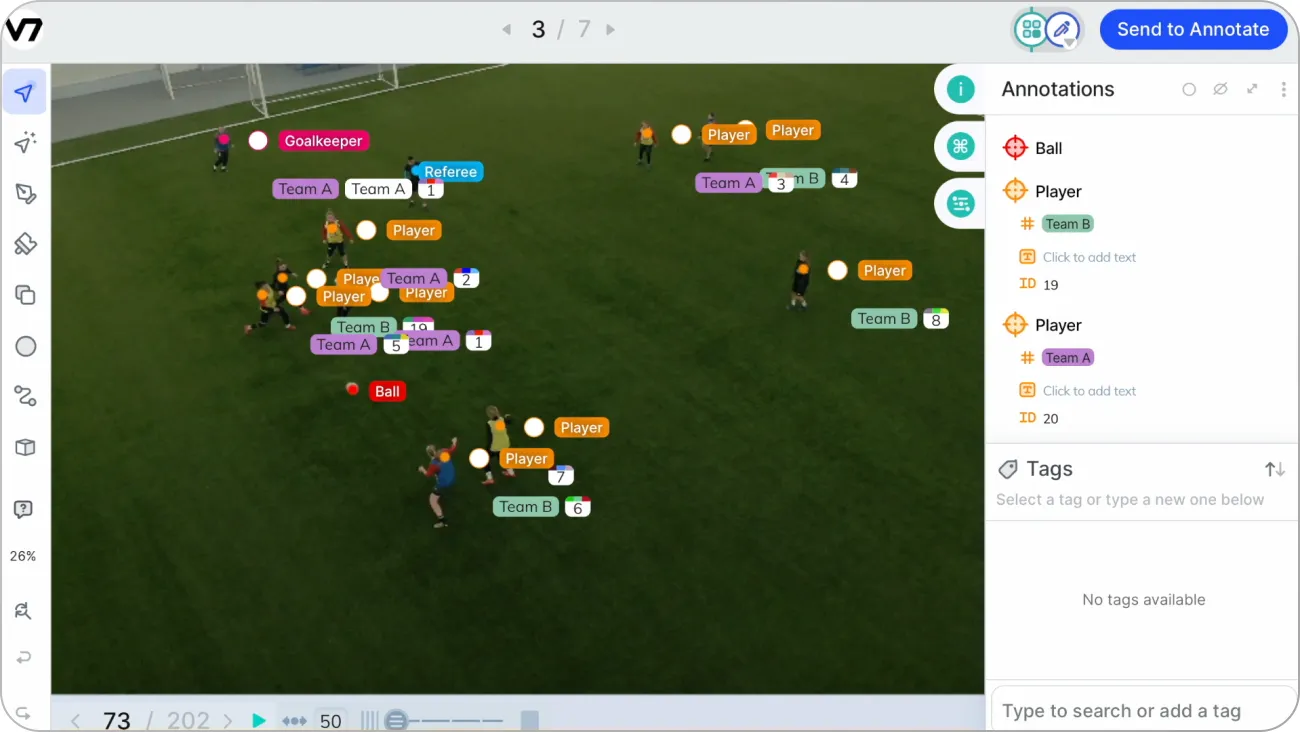
Keypoints provide high-quality data, but they require a lot of manual annotation. Bounding boxes and polygon annotations are generally easier to label and are commonly used in simpler computer vision tasks such as basic object detection.
While being very powerful in the right hands, keypoint-based image annotation presents several challenges. The primary ones are accuracy, consistency, and scalability.
The main drawbacks of keypoint annotations:
Identifying the precise location of some keypoints is extremely hard (parts of an object can be obscured or out of frame)
Human annotators may interpret landmarks differently or label them in slightly different locations
Creating keypoint annotations for large datasets can be time-consuming and labor-intensive
To address these challenges, it is important to use the right data annotation tools and establish clear annotation guidelines for your keypoints and keypoint skeletons. Additionally, you need to use quality control measures such as review stages to ensure best results.
How to annotate datasets with keypoint skeletons
Keypoints are often annotated by humans using specialized apps and techniques to provide training data for machine learning models. For example, V7 offers a web-based annotation tool that allows users to annotate keypoints with a simple click-and-drag interface.
The process of keypoint annotation typically involves manually identifying and labeling the relevant keypoints in an image or video sequence. This can be a labor-intensive task, but it is necessary to obtain accurate and reliable results. And you can significantly speed it up if you choose the right image annotation platform.
Step 1: Import your dataset
Step 2: Create a new keypoint skeleton
Step 3: Align the keypoints to the corresponding landmarks
Step 4: Repeat the process across your footage
Step 5: Export your data for model training
Let’s go through the steps one by one.
Step 1: Import your dataset
Once you created your V7 account, you can import your dataset into the annotation platform. This involves uploading the images or videos that you want to annotate as a new dataset.
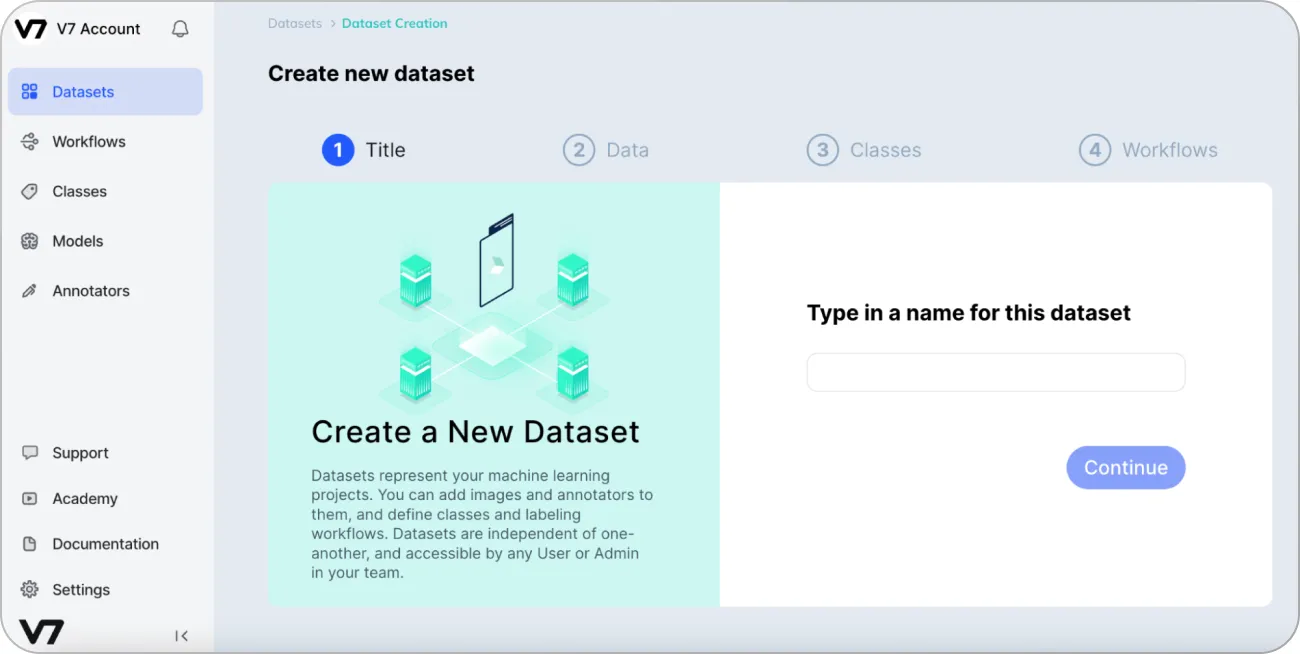
For now, all you need to do is come up with the name and drag-and-drop your images or videos. Proceed with the default settings with the remaining steps.
When importing videos, remember about using the right frame rate. With a very dynamic footage, you may want to stick with the native frame rate of the original video. But, if you want to develop a basic human activity recognition tool, (for instance for deciding if someone is standing or sitting down) you may get better results with lower frame rates and more footage variability.
Step 2: Create a new keypoint skeleton
The next step is to set up a new keypoint skeleton class. You can add new classes in the Classes tab of your dataset.
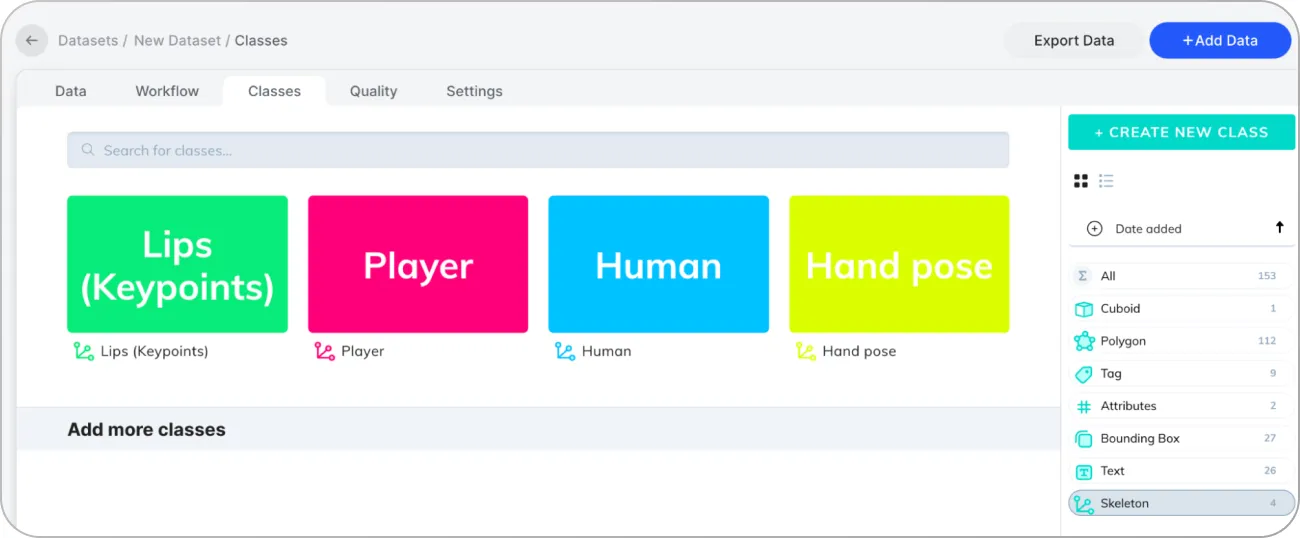
Clicking the + Create New Class button will let you set up a new annotation class of a specific type. Choose Skeleton and scroll down to build your custom keypoint skeleton in the editor.
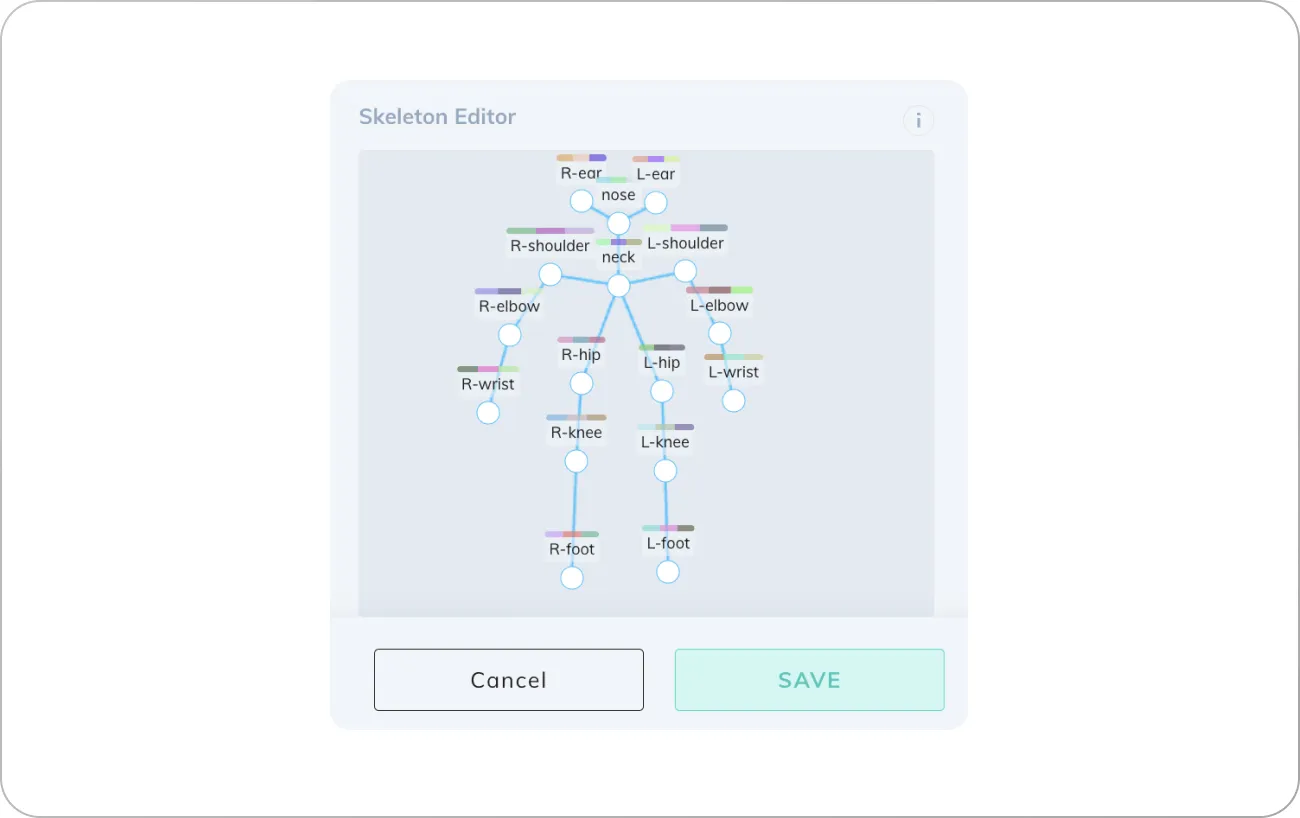
You should add all points and connect at least two of them. Naming each keypoint is also important, especially if the skeleton is symmetrical and has right and left sides. This allows for the labeling of corresponding keypoints on each side avoiding many unnecessary mistakes while annotating.
Step 3: Align the keypoints to the corresponding landmarks
Go back to your main dataset tab and choose an image you want to annotate. When you open the image, the annotation panel should open. V7 has a whole set of keypoint annotation tools. You can select the Keypoint Skeleton tool from the toolkit panel on the left.
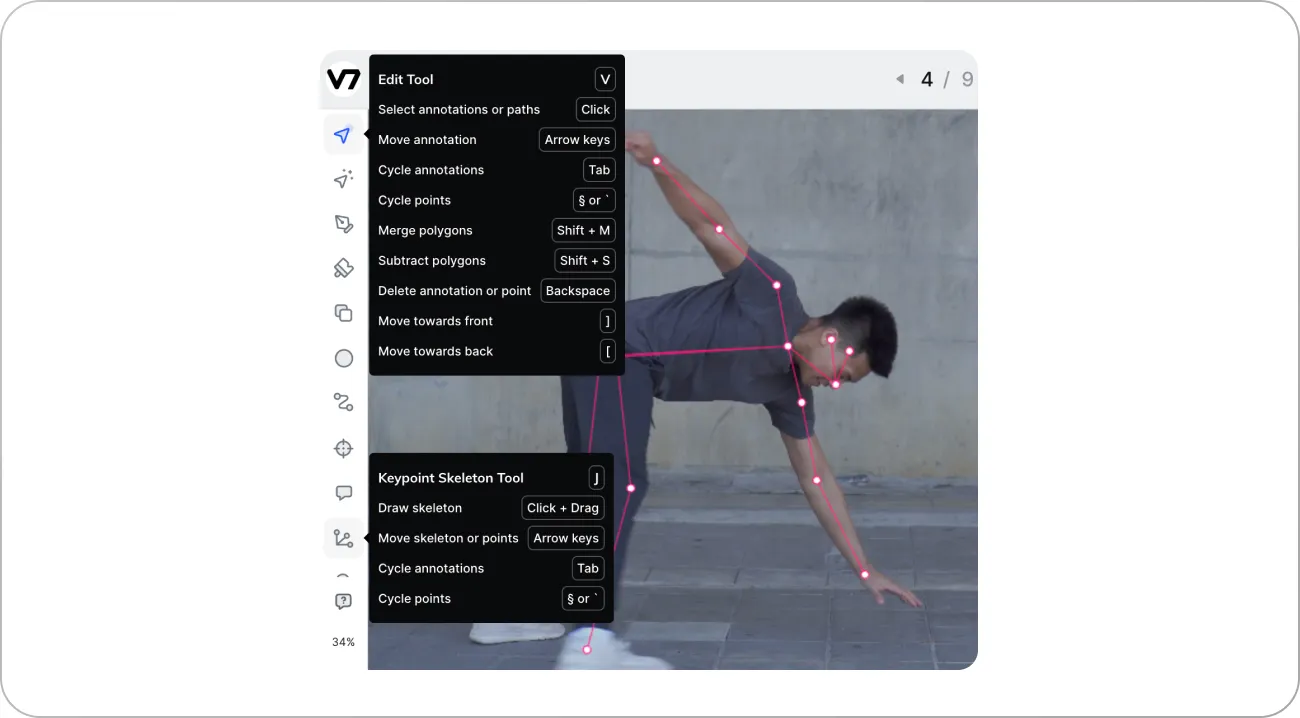
Align the keypoints of the skeleton to the corresponding landmarks in your frame. To do this you may need to switch back and forth between the Keypoint Skeleton Tool and the main Edit Tool. The first one is intended for drawing new skeletons while the second is for rearranging and aligning individual keypoints.
Step 4: Repeat the process across your footage
If you are annotating a video, you can use < and > buttons on your keyboard to navigate between frames. When annotating a single clip you can extend the length of your annotation to stretch it across the video timeline. For instance, you can extend the skeleton to the next 100 frames.
Then you can move between frames and adjust your annotations.
This means that you can annotate only every 5th or every 10th frame and the in-between frames will be annotated automatically. However, it’s good practice to go through the footage several times and make corrections if the positions happen to be misaligned.
Step 5: Export your data for model training
Once you are done with annotating you can mark your file as completed. Then, it is possible to export your annotation data in multiple formats.
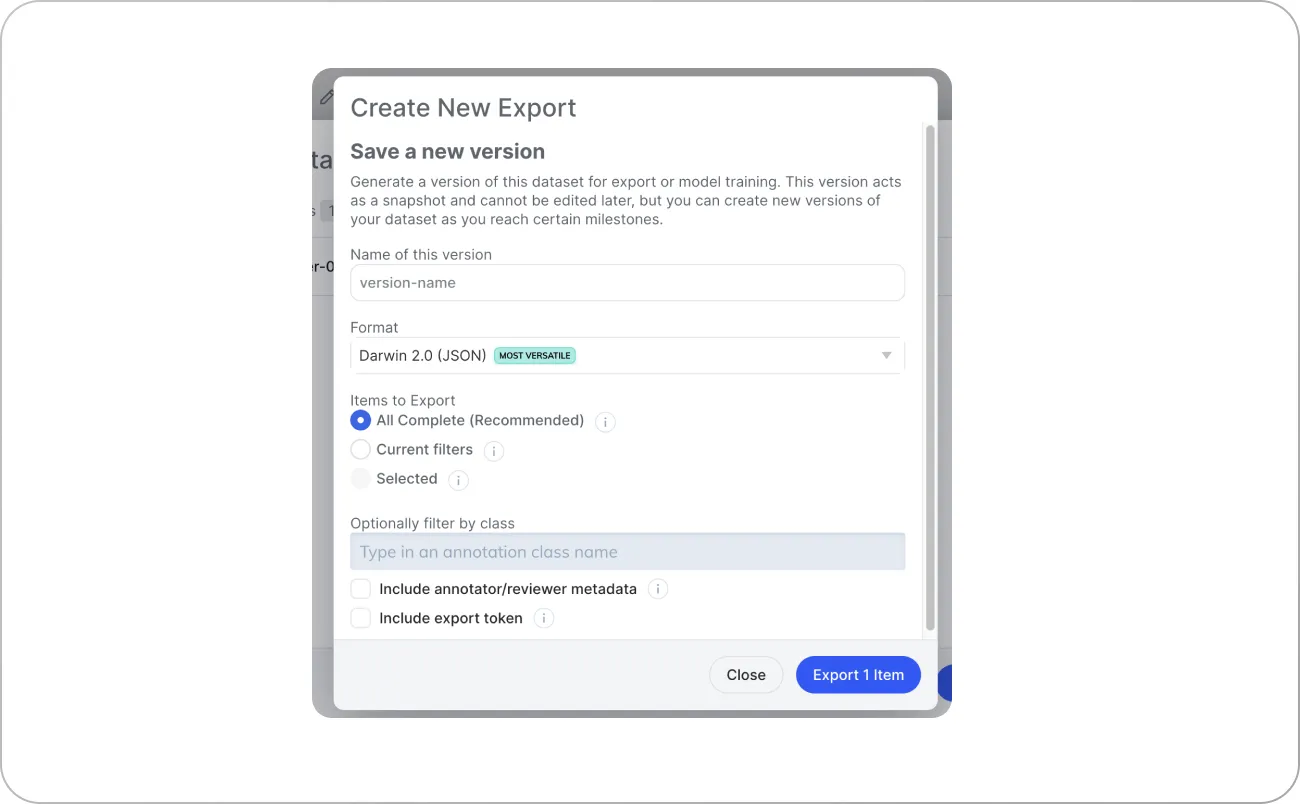
JSON files are the most versatile option. You can find more information about the format in the official V7 documentation.
And that’s it! You can use the export as the training data for your computer vision models.
If you need some additional tips, here is the list of best practices for keypoint annotation.
Best practices for using keypoints for ML dataset annotation
Let's go through a few rules for making sure your keypoint annotations will maintain the highest quality.
1. Write clear annotation instructions
It's essential to provide clear and concise instructions to the annotators. You have to ensure they understand the task and what is expected of them. This includes specifying the number of keypoints to be annotated, how to handle obscured keypoints, and what additional attributes or instance IDs should be added to annotations.
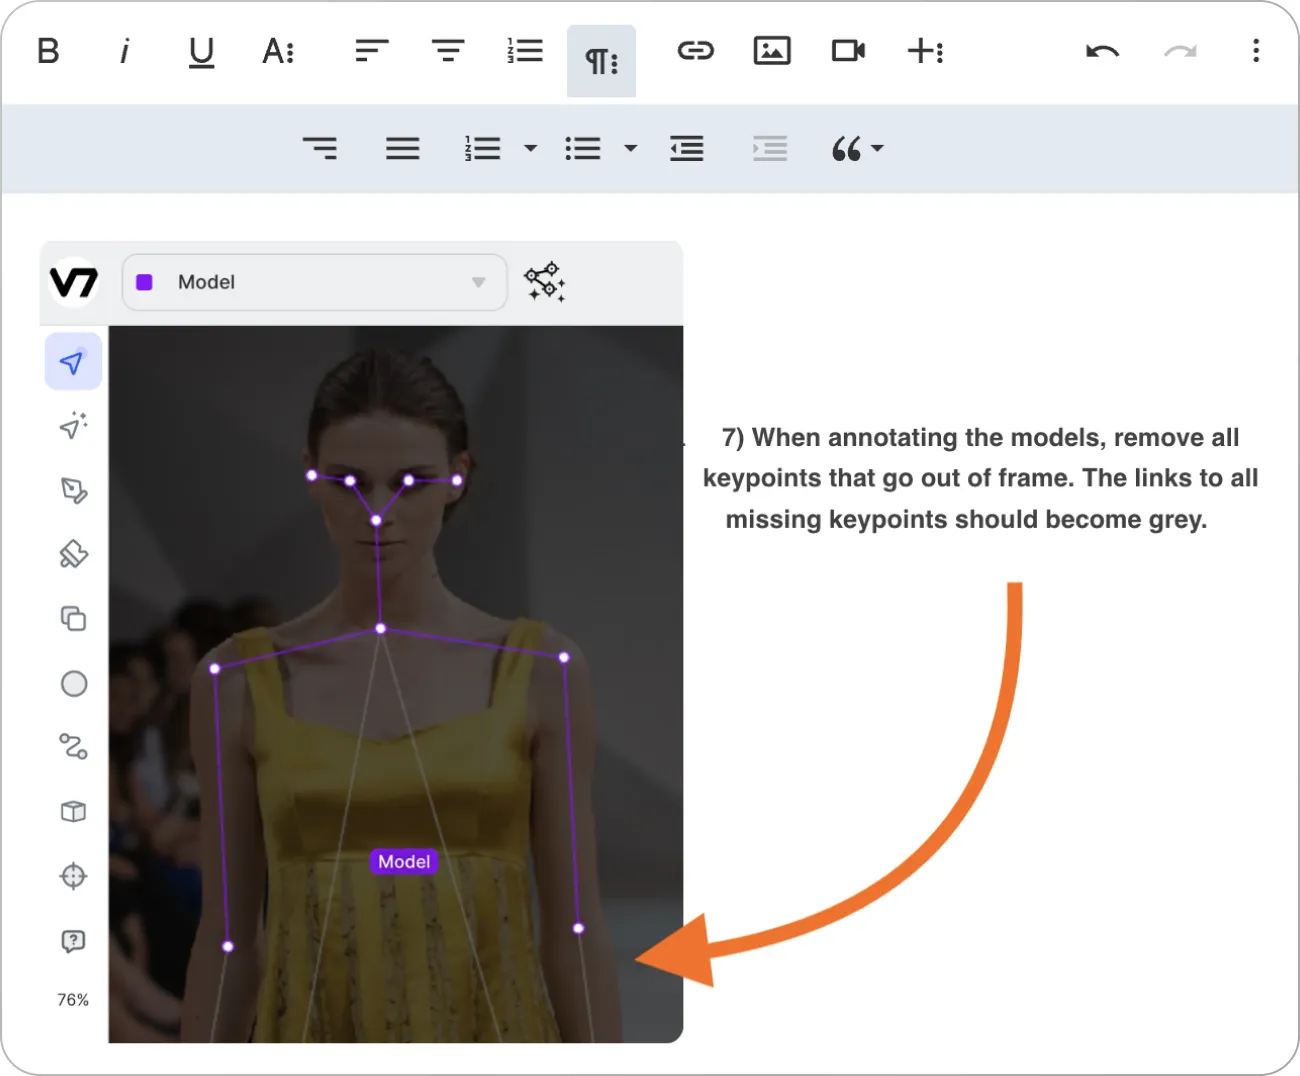
Include several examples of dos and don’ts to illustrate best practices for your annotation project. In V7, you can display a custom set of instructions every time a human annotator accepts a task assigned to them.
2. Incorporate models into your workflows
You can add multiple stages to your custom annotation workflows. These include a Model stage that lets you connect models trained on V7 or custom models registered with the platform. You can also connect external models to pre-process your training data.
Here is an example of footage analyzed and pre-labeled with a model using DLIB Frontal Face Detector:
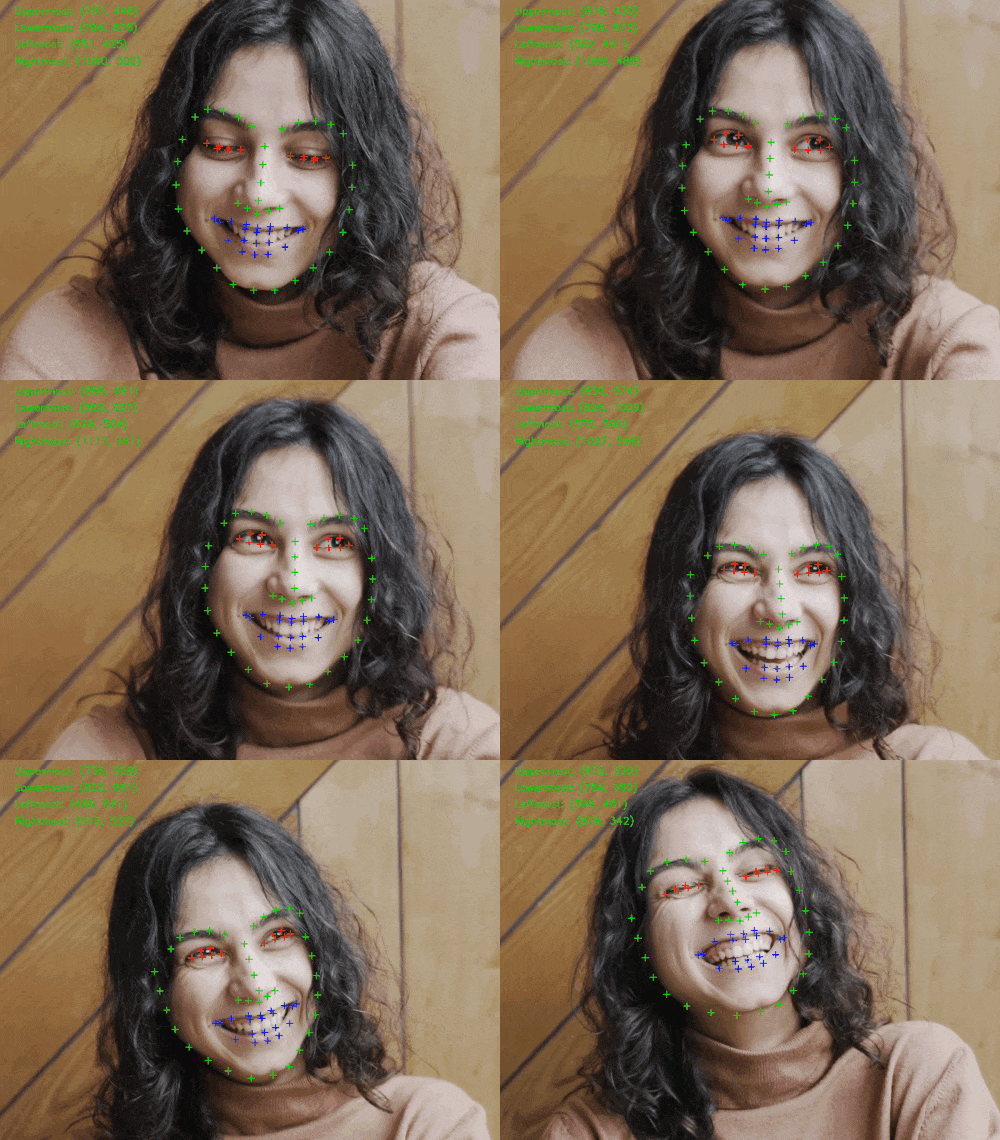
OpenPose (multi-person keypoint detection library) is another useful keypoint annotation tool. You can utilize existing free models and frameworks to make the process easier or even automate it completely by mapping specific points onto V7 classes. You can find out more about importing annotations here.
3. Use frame interpolation to speed up your work
Frame interpolation involves using software to estimate the positions of keypoints between two or more keyframes. This technique can save time when annotating videos by reducing the number of frames that you need to label manually.
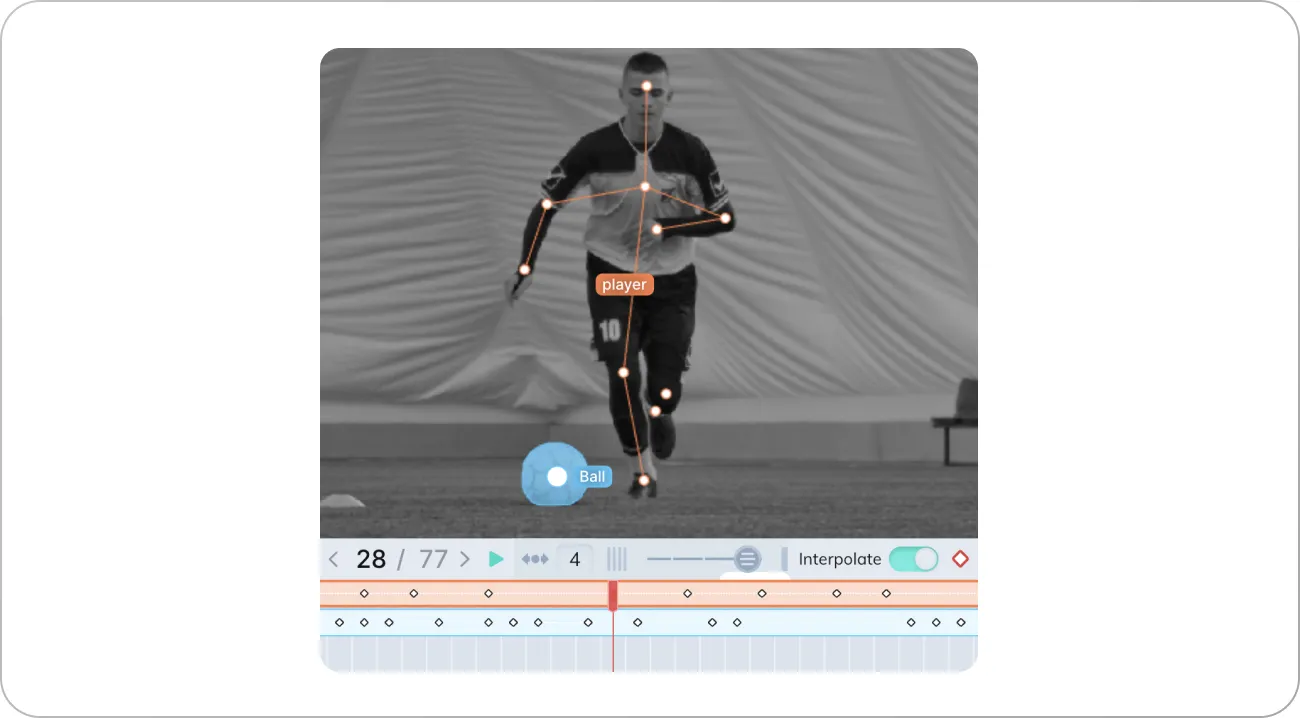
The example above shows a football player annotated with a keypoint skeleton and a ball annotated with a polygon. The keyframes for both annotations are indicated with the little diamond shapes. The polygon masks can also morph between frames but usually they require adding more keyframes.
While a basic shape, like a ball, may seem less complex than a skeleton with multiple joints, it is not the case.

The keypoint skeleton of our player has only 8 points (and 2 points without joints for the left leg) while the polygonal auto-annotation has much more. That’s why a smooth interpolation of the ball mask is harder. Keypoints, on the other hand, are perfect for movement analytics and frame interpolation.
As we mentioned before, V7 has the interpolation functionality turned on by default. This makes working with keypoint skeletons in video annotation tasks 10x faster and easier.
Pro tip: Check out V7 video annotation tool
4. Add review stages to assure high quality of the annotations
Reviewing can help to identify and correct any errors or inconsistencies in the annotations. Adding a dedicated stage where annotations can be reviewed and corrected by a senior annotator or supervisor is the best way to ensure high-quality of your training data.
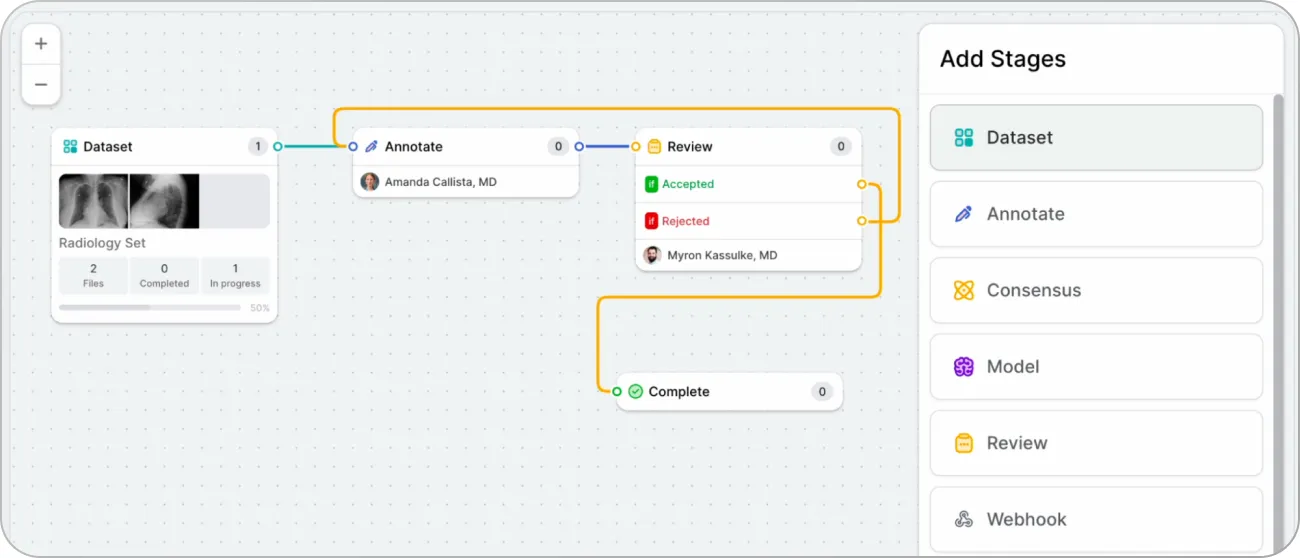
A reviewer can leave additional comments or list issues that need resolving. You can also design more complex annotation workflows with advanced logic and consensus stages.
Pro tip: Learn how to enhance your ML workflows with logic stage
5. Decide on the number of views you need for your project
In some cases, annotating landmarks on 2D images may not be enough. For example, if your project requires 3D reconstruction, it's important to determine the number of views required to capture all the necessary keypoints.
This decision can help in reducing the complexity of the annotation process and can also help in determining the optimal camera or scanner positions for capturing the required views.
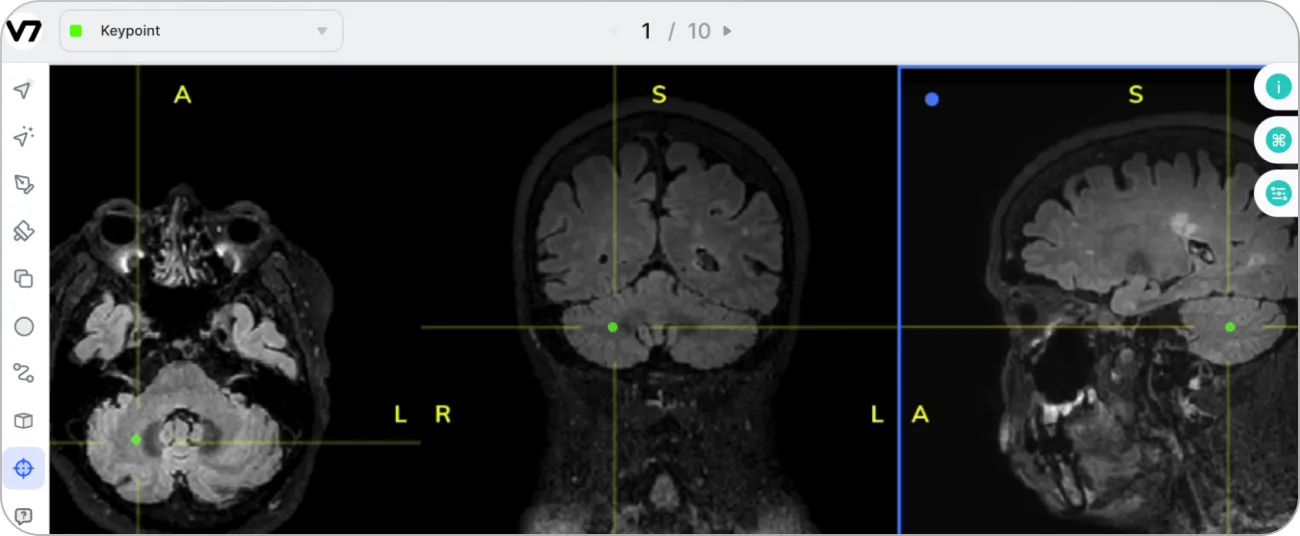
Using multi-view medical scans to add keypoint annotations and reconstruct landmark positions in 3D space is another important use case. To create state-of-the-art models for healthcare, using temporal or 3D data is frequently the best method.
Conclusion
Keypoint annotation remains a crucial method for preparing training data for machine learning models. Keypoints and keypoint skeletons provide a more nuanced understanding of the spatial relationships between different objects or structures within each image. They give context additional insights that other annotation techniques may miss.
Key takeaway:
Keypoint annotation is a technique used in computer vision to identify landmarks on objects in images or videos
Keypoints can be connected into keypoint skeletons
Keypoint annotation involves labeling specific keypoints to determine their position or movement.
Keypoint annotation is highly accurate and is used in complex computer vision tasks such as human and animal pose estimation or skeleton-based action recognition
To overcome challenges related to accuracy, consistency, and scalability of keypoint annotation, it is necessary to use appropriate data annotation tools, set up a review process, and establish clear annotation guidelines
It is a good idea to consider using auxiliary models, or keypoint annotation services
If you're interested in keypoint annotation and want to learn more about our software, book a demo. Additionally, if you don't want to label data yourself, feel free to contact us for a quote on our professional data labeling services.
