Data labeling
Data Annotation Tutorial: Definition, Tools, Datasets
14 min read
—

This is the only guide you need to master data annotation for machine learning. Use V7's tips and tricks to speed up your labeling and start building machine learning models that don't suck.

Nilesh Barla
Guest Author and Founder

Data is an integral part of all machine learning and deep learning algorithms.
It is what drives these complex and sophisticated algorithms to deliver state-of-the-art performances.
However—
If you want to build truly reliable AI models, you must provide the algorithms with data that is properly structured and labeled.
And that's where the process of data annotation comes into play.
You need to annotate data so that the machine learning systems can use it to learn how to perform given tasks.
Data annotation is simple, but it might not be easy 😉 Luckily, we are about to walk you through this process and share our best practices that will save you plenty of time (and trouble!).
Here’s what we’ll cover:
What is data annotation?
Types of data annotations
Automated data annotation vs. human annotation
V7 data annotation tutorial

Data labeling
Data labeling platform
Get started today
What is data annotation?
Essentially, this comes down to labeling the area or region of interest—this type of annotation is found specifically in images and videos. On the other hand, annotating text data largely encompasses adding relevant information, such as metadata, and assigning them to a certain class.
In machine learning, the task of data annotation usually falls into the category of supervised learning, where the learning algorithm associates input with the corresponding output, and optimizes itself to reduce errors.
Types of data annotations
Here are various types of data annotation and their characteristics.
Image annotation
Image annotation is the task of annotating an image with labels. It ensures that a machine learning algorithm recognizes an annotated area as a distinct object or class in a given image.
It involves creating bounding boxes (for object detection) and segmentation masks (for semantic and instance segmentation) to differentiate the objects of different classes. In V7, you can also annotate the image using tools such as keypoint, 3D cuboids, polyline, keypoint skeleton, and a brush.
Check out 13 Best Image Annotation Tools to find the annotation tool that suits your needs.
Image annotation is often used to create training datasets for the learning algorithms.
Those datasets are then used to build AI-enabled systems like self-driving cars, skin cancer detection tools, or drones that assess the damage and inspect industrial equipment.
Check out AI in Healthcare and AI in Insurance to learn more about AI applications in those industries.
Now, let’s explore and understand the different types of image annotation methods.
Bounding box
The bounding box involves drawing a rectangle around a certain object in a given image. The edges of bounding boxes ought to touch the outermost pixels of the labeled object.
Otherwise, the gaps will create IoU (Intersection over Union) discrepancies and your model might not perform at its optimum level.

Read Annotating With Bounding Boxes: Quality Best Practices to learn more.
3D cuboids
The 3D cuboid annotation is similar to bounding box annotation, but in addition to drawing a 2D box around the object, the user has to take into account the depth factor as well. It can be used to annotate objects such on flat planes that need to be navigated, such as cars or planes, or objects that require robotic grasping.
You can annotate with cuboids to build to train the following model types:
- Object Detection
- 3D Cuboid Estimation
- 6DoF Pose Estimation
Creating a 3D cuboid in V7 is quite easy, as V7's cuboid tool automatically connects the bounding boxes you create by adding a spatial depth. Here's the image of a plane annotated using cuboids.

Polygons
While creating a 3D cuboid or a bounding box, you might notice that various objects might get unintentionally included in the annotated region. This situation is far from ideal, as the machine learning model might get confused and, as a result, misclassify those objects.
Luckily, there's a way to avoid this situation—
And that's where polygons come in handy. What makes them so effective is their ability to create a mask around the desired object at a pixel level.
V7 offers two ways in which you can create pixel-perfect polygon masks.
a) Polygon tool
You can pick the tool and simply start drawing a line made of individual points around the object in the image. The line doesn't need not be perfect, as once the starting and ending points are connected around the object, V7 will automatically create anchor points that can be adjusted for the desired accuracy.
Once you've created your polygon masks, you can add a label to the annotated object.

b) Auto-annotation tool
V7's auto-annotate tool is an alternative to manual polygon annotation that allows you to create polygon and pixel-wise masks 10x faster.

Ready to train your models? Have a look at Mean Average Precision (mAP) Explained: Everything You Need to Know.
Keypoint tool
Keypoint annotation is another method to annotate an object by a series or collection of points.
This type of method is very useful in hand gesture detection, facial landmark detection, and motion tracking. Keypoints can be used alone, or in combination to form a point map that defines the pose of an object.

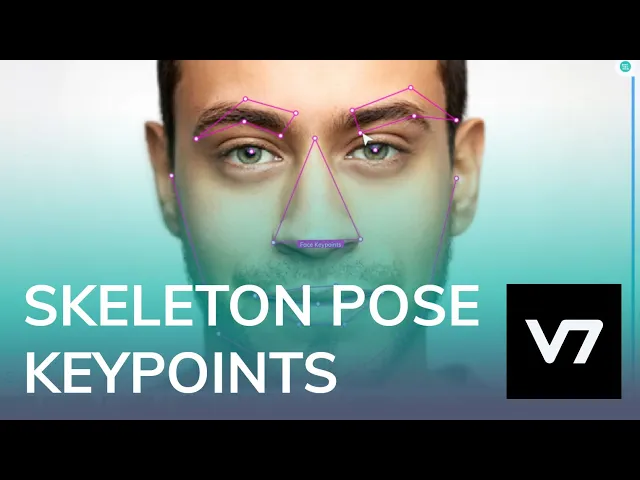
Keypoint skeleton tool
V7 also offers keypoint skeleton tool—a network of keypoints connected by vectors, used specifically for pose estimation.
It is used to define the 2D or 3D pose of a multi-limbed object. Keypoints skeletons have a defined set of points that can be moved to adapt to an object’s appearance.
You can use keypoint annotation to train a machine learning model to mimic human pose and then extrapolate their functionality for task-specific applications, for example, AI-enabled robots.
See how you can annotate your image and video data using the keypoint skeleton in V7.
Check out 27+ Most Popular Computer Vision Applications and Use Cases.
Polyline tool
Polyline tool allows the user to create a sequence of joined lines.
You can use this too by clicking around the object of interest to create a point. Each point will create a line by joining the current point with the previous one. It can be used to annotate roads, lane marking, traffic signs, etc.

Semantic segmentation
Semantic segmentation is the task of grouping together similar parts or pixels of the object in a given image. Annotating data using this method allows the machine learning algorithm to learn and understand a specific feature, and it can help it to classify anomalies.
Semantic segmentation is very useful in the medical field, where radiologists use it to annotate X-Ray, MRI, and CT scans to identify the region of interest. Here's an example of a chest X-Ray annotation.

If you are looking for medical data, check out our list of healthcare datasets and see how you can annotate medical imaging data using V7.

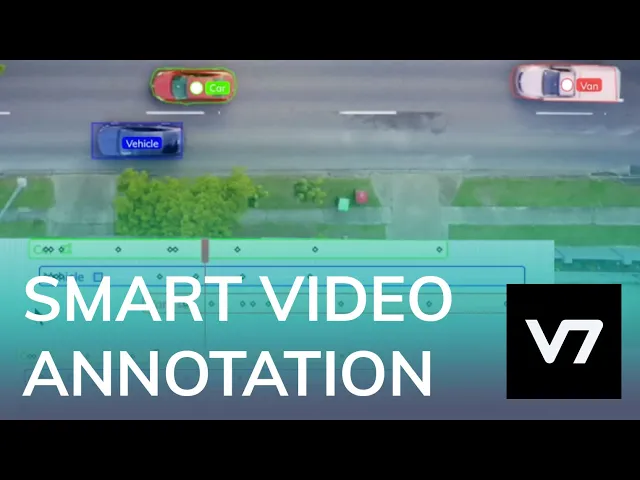
Video annotation
Similar to image annotation, video annotation is the task of labeling sections or clips in the video to classify, detect or identify desired objects frame by frame.
Video annotation uses the same techniques as image annotation like bounding boxes or semantic segmentation, but on a frame-by-frame basis. It is an essential technique for computer vision tasks such as localization and object tracking.
Here's how V7 handles video annotation.


Text annotation
Data annotation is also essential in tasks related to Natural Language Processing (NLP).
Text annotation refers to adding relevant information about the language data by adding labels or metadata. To get a more intuitive understanding of text annotation let's consider two examples.
1. Assigning Labels
Adding labels means assigning a sentence with a word that describes its type. It can be described with sentiments, technicality, etc. For example, one can assign a label such as “happy” to this sentence “I am pleased with this product, it is great”.
2. Adding metadata
Similarly, in this sentence “I’d like to order a pizza tonight”, one can add relevant information for the learning algorithm, so that it can prioritize and focus on certain words. For instance, one can add information like “I’d like to order a pizza (food_item) tonight (time)”.
For text annotation capabilities, check out our guide to OCR Software!
Now, let’s briefly explore various types of text annotations.
Sentiment Annotation
Sentiment annotation is nothing but assigning labels that represent human emotions such as sad, happy, angry, positive, negative, neutral, etc. Sentiment annotation finds application in any task related to sentiment analysis (e.g. in retail to measure customer satisfaction based on facial expressions)
Intent Annotation
The intent annotation also assigns labels to the sentences, but it focuses on the intent or desire behind the sentence. For instance, in a customer service scenario, a message like “I need to talk to Sam”, can route the call to Sam alone, or a message like “I have a concern about the credit card” can route the call to the team dealing credit card issues.
Named Entity Annotation (NER)
Named entity recognition (NER) aims to detect and classify predefined named entities or special expressions in a sentence.
It is used to search for words based on their meaning, such as the names of people, locations, etc. NER is useful in extracting information along with classifying and categorizing them.
Semantic annotation
Semantic annotation adds metadata, additional information, or tags to text that involves concepts and entities, such as people, places, or topics, as we saw earlier.
Automated data annotation vs. human annotations.
As the hours pass by, human annotators get tired and less focused, which often leads to poor performance and errors. Data annotation is a task that demands utter focus and skilled personnel, and manual annotation makes the process both time-consuming and expensive.
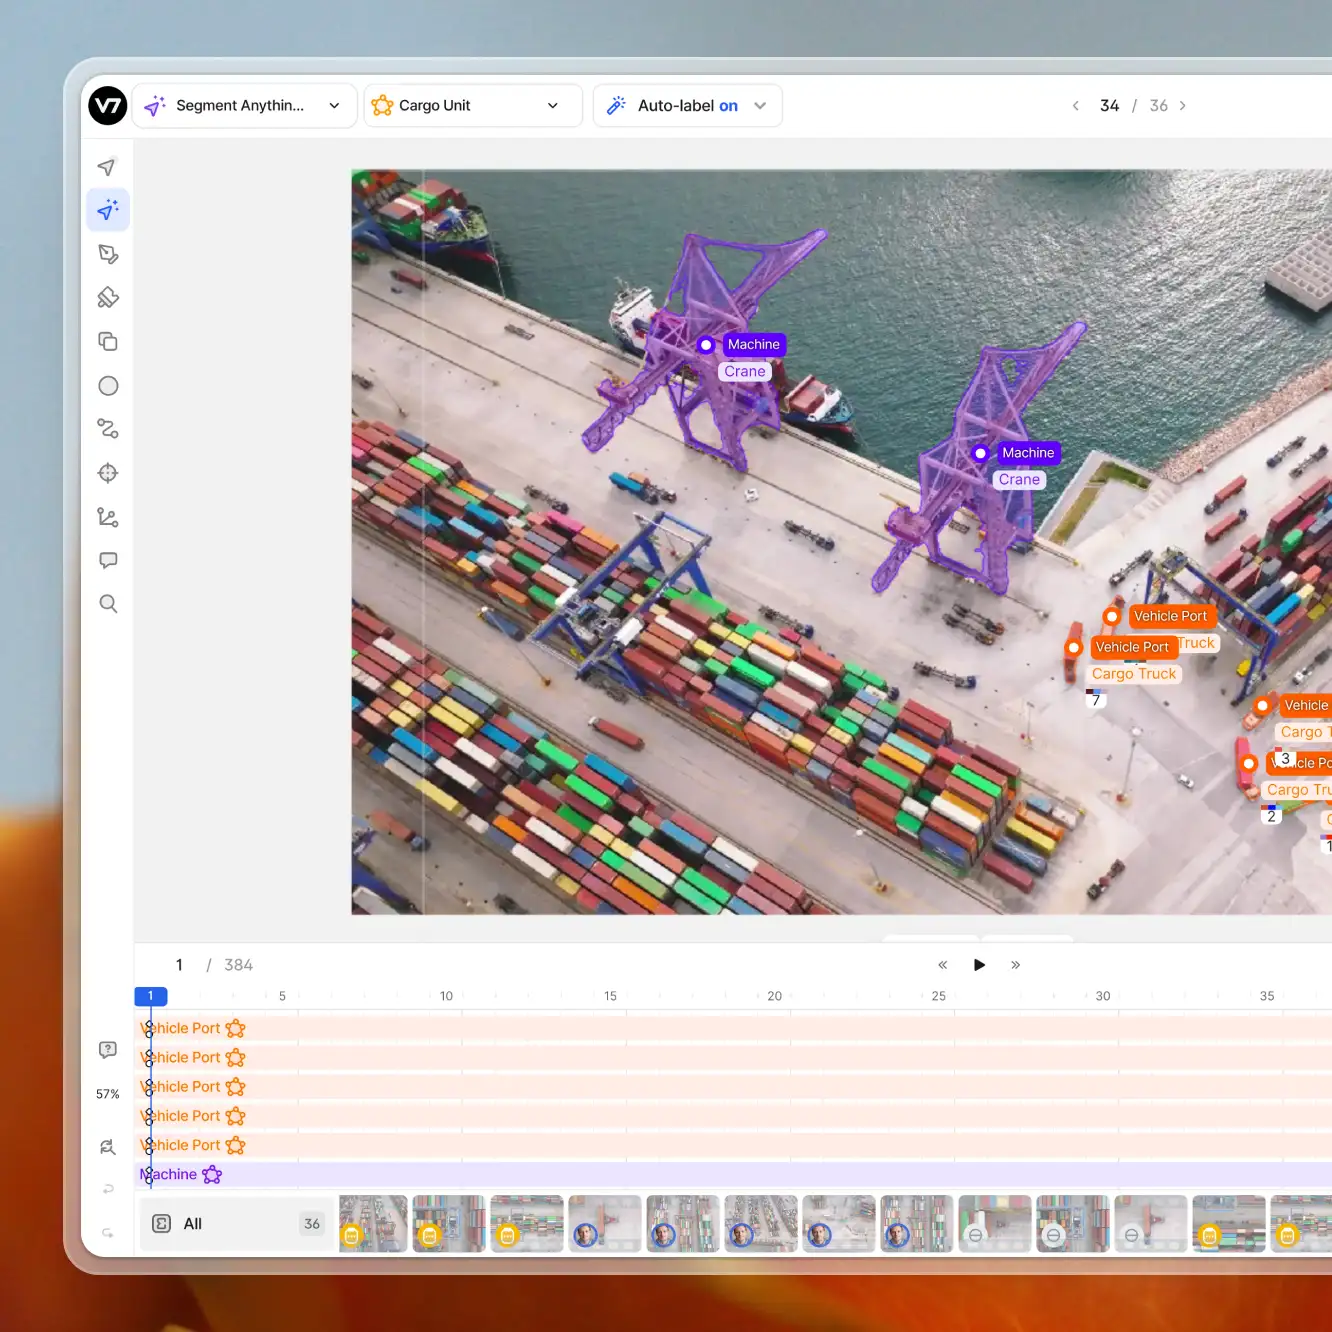
That's why leading ML teams bet on automated data labeling.
Here's how it works—
Once the annotation task is specified, a trained machine learning model can be applied to a set of unlabeled data. The model will then be able to predict the appropriate labels for the new and unseen dataset.
Here's how you can create an automated workflow in V7.

However, in cases where the model fails to label correctly, humans can intervene, review, and correct the mislabelled data. The corrected and reviewed data can be then used to train the labeling model once again.
Automated data labeling can save you tons of money and time, but it can lack accuracy. In contrast, human annotation can be much more costly, but it tends to be more accurate.
V7 data annotation tutorial
Finally, let me show you how you can take your data annotation to another level with V7 and start building robust computer vision models today.
To get started, go ahead and sign up for your 14-day free trial.
Once you are logged in, here's what to do next.
1. Collect and prepare training data
First and foremost, you need to collect the data you want to work with. Make sure that you access quality data to avoid issues with training your models.
Feel free to check out public datasets that you can find here:

Once the data is downloaded, separate training data from the testing data. Also, make sure that your training data is varied, as it will enable the learning algorithm to extract rich information and avoid overfitting and underfitting.
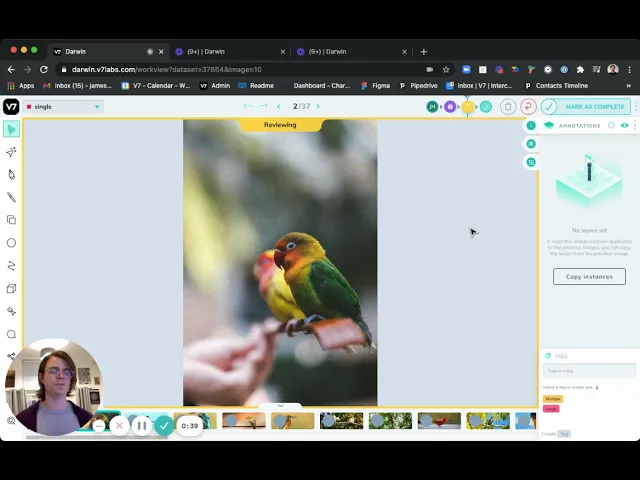
2. Upload data to V7
Once the data is ready, you can upload it in bulk. Here's how:
1. Go to the Datasets tab in V7's dashboard, and click on “+ New Dataset”.

2. Give a name to the dataset that you want to upload.

It's worth mentioning that V7 offers three ways of uploading data to their server.
One is the conventional method of dragging and dropping the desired photos or folder to the interface. Another one is uploading by browsing in your local system. And the third one is by using the command line (CLI SDK) to directly upload the desired folder into the server.
Once the data has been uploaded, you can add your classes. This is especially helpful if you are outsourcing your data annotation or collaborating with a team, as it allows you to create annotation checklist and guidelines.
If you are annotating yourself, you can skip this part and add classes on the go later on in the "Classes" section or directly from the annotated image.

Not sure what kind of model you want to build? Check out 15+ Top Computer Vision Project Ideas for Beginners.
3. Decide on the annotation type
If you have followed the steps above and decided to “Add New Class”, then you will have to add the class name and choose the annotation type for the class or the label that you want to add.

As mentioned before, V7 offers a wide variety of annotation tools, including:
Auto-annotation
Polygon
Polyline
Bounding box
Cuboid
Brush
Keypoint
Keypoint skeleton
Ellipse
Once you have added the name of your class, the system will save it for the whole dataset.
Image annotation
Image annotation experience in V7 is very smooth.
In fact, don't believe just me—here's what one of our users said in his G2 review:
V7 gives fast and intelligent auto-annotation experience. It's easy to use. UI is really interactive.
Apart from a wide range of available annotation tools, V7 also comes equipped with advanced dataset management features that will help you organize and manage your data from one place.
And let's not forget about V7's Neural Networks that allow you to train instance segmentation, image classification, and text recognition models.
Video annotation
Unlike other annotation tools, V7 allows you to annotate your data as a video rather than individual images.
You can upload your videos in any format, add and interpolate your annotations, create keyframes and sub annotations, and export your data in a few clicks!
Uploading and annotating videos is as simple as annotating images.
V7 offers frame by frame annotation method where you can essentially create a bounding box or semantic segmentation per-frame basis.

Text annotation
Apart from image and video annotation, V7 provides text annotation as well. Users can take advantage of the Text Scanner model that can automatically read the text in the images.
Text annotation can also be achieved with OCR technology, check out our OCR guide here!.
To get started, just go to the Neural Networks tab and run the Text Scanner model.

Once you have turned it on you can go back to the dataset tab and load the dataset. It is the same process as before.
Now you can create a new bounding box class. The bounding box will detect text in the image. You can specify the subtype as Text in the Classes page of your dataset.

Once the data is added and the annotation type is defined you can then add the Text Scanner model to your workflow under the Settings page of your dataset.

After adding the model to your workflow map your new text class.

Now, go back to the dataset tab and send your data the text scanner model by clicking on ‘Advance 1 Stage’; this will start the training process.

Once the training is over the model will detect and read text on any kind of image, whether it's a document, photo, or video.

If you are looking for a free image annotation tool, check out The Complete Guide to CVAT—Pros & Cons
Data annotation: Next steps
Nice job! You've made it that far.
By now, you should have a pretty good idea of what is data annotation and how you can annotate data for machine learning.
We've covered image, video, and text annotation, which are used in training computer vision models. If you want to apply your new skills, go ahead, pick a project, sign up to V7, collect some data, and start labeling it to build image classifier or object detectors!
To learn more, go ahead and check out:
An Introductory Guide to Quality Training Data for Machine Learning
Simple Guide to Data Preprocessing in Machine Learning
Data Cleaning Checklist: How to Prepare Your Machine Learning Data
3 Signs You Are Ready to Annotate Data for Machine Learning
The Beginner’s Guide to Contrastive Learning
9 Reinforcement Learning Real-Life Applications
Mean Average Precision (mAP) Explained: Everything You Need to Know
Nilesh Barla
Nilesh Barla is the founder of PerceptronAI, which aims to provide solutions in medical and material science through deep learning algorithms. He studied metallurgical and materials engineering at the National Institute of Technology Trichy, India, and enjoys researching new trends and algorithms in deep learning.


