Darwin fundamentals
Darwin advanced
Play video
6:37
Play video
6:37
Play video
6:37
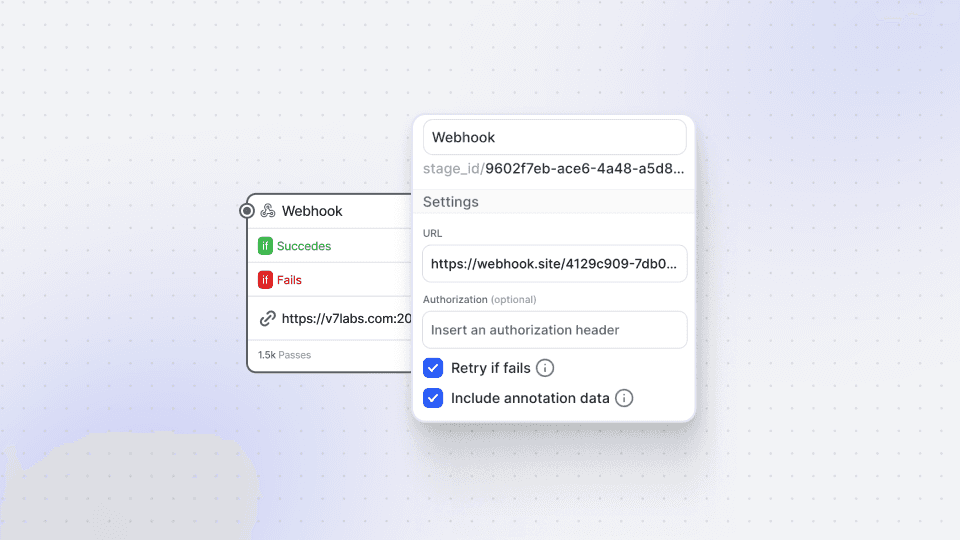
In this video session, we explore the Webhook stage in V7 workflows, a powerful feature that enables real-time communication between V7 and other applications. This guide will walk you through the concept of webhooks, their functionality, and how to integrate them into your workflow. You'll discover how to automate tasks using user-friendly solutions like Zapier and advanced developer solutions like AWS Object Lambda.
Webhooks are your go-to solution for a wide range of needs, whether it's sending notifications, processing Darwin JSON files in external applications, or filtering datasets. They let you trigger specific actions, such as sending Slack notifications based on custom tags or other conditions, giving you complete control over your machine learning processes.
To assist you in getting started, we provide a detailed, step-by-step walkthrough on creating a new workflow, adding the webhook stage, and seamlessly connecting it with other stages. Additionally, the video demonstrates how to test the webhook stage to ensure flawless functionality. You'll also find practical examples of leveraging webhooks with external tools for tasks like counting annotations. Moreover, since you can use Darwin JSON as a webhook payload, in some cases, you can even run inference on external applications and use them similarly to the BYOM feature.
By mastering the art of setting up and utilizing webhooks, you'll be able to create complex workflows tailored to your specific needs, all without the need for coding.
Webhook documentation: https://docs.v7labs.com/reference/webhooks
Up next
3:49
Watch video

Auto-Annotate Tool
How does the Auto-Annotate tool work? We tackle accurate polygon and pixel-wise annotation masks.
3:49
Watch video
Auto-Annotate Tool
How does the Auto-Annotate tool work? We tackle accurate polygon and pixel-wise annotation masks.
3:49
Watch video
Auto-Annotate Tool
How does the Auto-Annotate tool work? We tackle accurate polygon and pixel-wise annotation masks.
16:35
Watch video
Annotations - Getting Started
We dive into image annotation and explain how you can get the most out of these impressive features.
16:35
Watch video
Annotations - Getting Started
We dive into image annotation and explain how you can get the most out of these impressive features.
16:35
Watch video
Annotations - Getting Started
We dive into image annotation and explain how you can get the most out of these impressive features.
5:56
Watch video
Auto-Annotate Tips & Tricks
Wield Auto-Annotate like the experts, with tips and tricks to accelerate your use of the tool.
5:56
Watch video
Auto-Annotate Tips & Tricks
Wield Auto-Annotate like the experts, with tips and tricks to accelerate your use of the tool.
5:56
Watch video
Auto-Annotate Tips & Tricks
Wield Auto-Annotate like the experts, with tips and tricks to accelerate your use of the tool.