Pull Export Versions
Darwin fundamentals
Darwin advanced
Play video
8:36
Play video
8:36
Play video
8:36
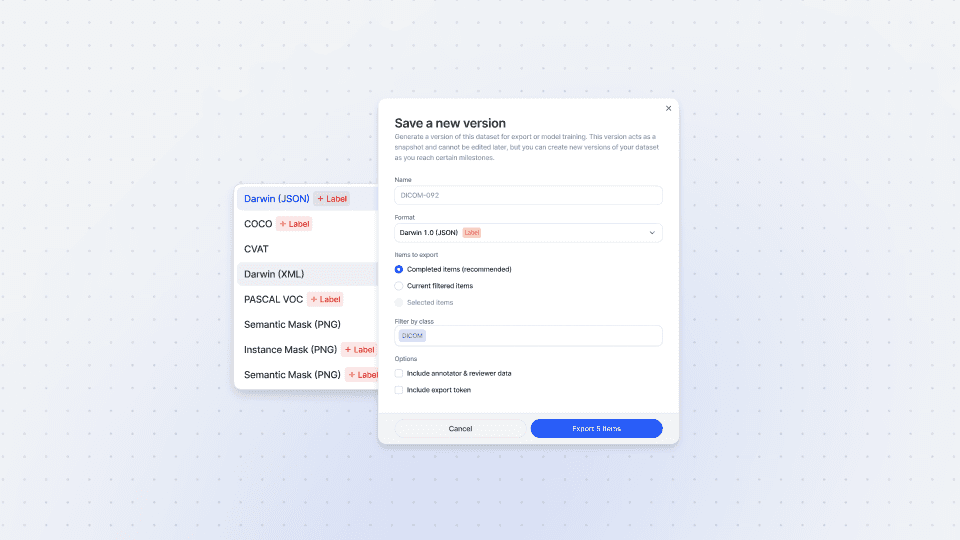
In this Darwin Advanced session, we take a close look at Exports. We tackle the four ways to export a dataset you’ve created within Darwin - the V7 user interface, CLI, SDK, or REST API - and provide a step-by-step guide on how to use each of these methods to export your data. Looking for something simpler? Head to our Darwin Fundamentals session on Exports.
V7’s Darwin is built to flex around your needs, which is why you’ll find Exports an intuitive process. When exporting from Darwin, you have a host of supported file formats, including COCO, Darwin JSON, CVAT, Instance PNG, YOLO, and many others.
In this tutorial, we take you through the export process beginning with the V7 UI. This is a simple-to-use interface that allows you to export complete annotations, specifically selected files, or apply filters to export specific data.
Next, we explore the SDK. We discuss the necessity to import your dependencies - as with any script or code you write - and outline how to connect to V7 using an API key. After the SDK, we explore how to use the REST API to export data, making note of dependencies, targeting datasets, and defining parameters for your export version.
By the end of this video, you’ll have a comprehensive understanding of how to export datasets within V7, backed by best practices tips, and tricks to effectively leverage your data for training models.
Up next
3:49
Watch video
Auto-Annotate Tool
How does the Auto-Annotate tool work? We tackle accurate polygon and pixel-wise annotation masks.
3:49
Watch video
Auto-Annotate Tool
How does the Auto-Annotate tool work? We tackle accurate polygon and pixel-wise annotation masks.
3:49
Watch video
Auto-Annotate Tool
How does the Auto-Annotate tool work? We tackle accurate polygon and pixel-wise annotation masks.
16:35
Watch video

Annotations - Getting Started
We dive into image annotation and explain how you can get the most out of these impressive features.
16:35
Watch video
Annotations - Getting Started
We dive into image annotation and explain how you can get the most out of these impressive features.
16:35
Watch video
Annotations - Getting Started
We dive into image annotation and explain how you can get the most out of these impressive features.
5:56
Watch video
Auto-Annotate Tips & Tricks
Wield Auto-Annotate like the experts, with tips and tricks to accelerate your use of the tool.
5:56
Watch video
Auto-Annotate Tips & Tricks
Wield Auto-Annotate like the experts, with tips and tricks to accelerate your use of the tool.
5:56
Watch video
Auto-Annotate Tips & Tricks
Wield Auto-Annotate like the experts, with tips and tricks to accelerate your use of the tool.